Showing posts with label home. Show all posts

Friday, September 21, 2012

Turn those Home Grown Tomatoes into Homemade Salsa

Your journey from tomato seed to edible tomato began a few months ago. Now you have so many tomatoes you aren’t sure what to do with all of them. You have given so many to the neighbors that when they see you coming they close their front doors and hide, because they don’t want anymore. Ok, maybe it’s not that bad, but you get the point.

One of the best ways to preserve your tomato harvest is to learn some canning methods. Particularly the water bath canning method. I will get to more on that in a moment. This method allows you to take your tomatoes and safely preserve them for consumption later on. If done correctly, they could last for up to one year.

But if you really want to maximize your time, efforts and tomato harvest, then combine the canning process with pre-made dishes. In other words, before you can your tomatoes, turn them into something first, i.e. tomato sauce, tomato soup, or as is the case with this article, salsa. What you choose is up to you, but it will definitely make things easier later on down the line.

Today I am focusing in on salsa. You can add it to just about anything, or nothing at all and use it as a dip for chips and tortillas. When you make a salsa from your own home grown tomatoes, it really tastes that much better. So let’s begin. 

I would like to say that I am a seasoned chef and conjured up my own salsa recipe, however I did not.  I use a pre-made mix that requires adding nothing more than my own tomatoes and distilled vinegar.

As shown in the picture, I used Mrs. Wages salsa mix.  A nice and easy recipe that anyone with 10 minutes and a working stove can make (and tomatoes of course).

I chose the mild/medium salsa as I am not one that likes things too spicy, however, even that had a bit of a kick to it.  At least to me anyway.

Follow the instructions on the back to prepare the mix.  The only thing you will need to add is vinegar and your tomatoes.  So below I gave a brief example of how to get your tomatoes started.


I used a variety of tomatoes to make up my salsa.  This season I grew beefsteak, romas and cherry.  If you look in the photo you will see a combination of all three, with a bit more romas then the others.

Most people use only romas because they are easy to cut the core out and keep the seeds out of their salsa mix.  The choice is up to you.

To get your tomatoes ready for the salsa mix, you will first need to blanch them.  This makes removing the skins (which you don't want), much much easier.  Blanching is simply the process of putting your tomatoes into boiling water for 45 seconds, then removing them and immediately submerging them into ice water.


Join our leftover seeds mailing list  


Once the blanching process has been completed, move the tomatoes to an area with enough space and start removing the skins by hand.  You should not have to use a knife or any other tool to remove the skins.  Save the knife for the dicing step.  If you do, place the tomato back into the boiling water for a little bit longer.


After you have "skinned" the tomatoes, use a sharp knife to dice them.  Cut the tomatoes into small cubes then place the diced tomatoes into your salsa mix. 

Follow the instructions on the back of the pack, which is bringing the tomato mixture to a boil, then reducing the heat and letting it simmer for 10 minutes.

If you plan on canning your salsa for long term storage, then please read the rest of this article.  If you plan on consuming your salsa within the next few weeks, then you can skip the canning portion and read the part of putting the salsa into canning jars.

If you plan to "can" your salsa
Before you begin the above tomato salsa mix, get your canning supplies ready.  Get your water bath going over high heat to get it to a boil and another large pot on a medium to low heat that you will submerge your jars, lids and bands into to sterilize.

I used pint sized jars and made enough to fill four and a half pints.  I felt using smaller jars made it easier to consume in reasonable sized quantities later on.


Get your other canning tools ready.  They normally consist of a jar grabber, tongs, a magnet, funnel and jar tightener.

Each serve a valuable purpose in the canning process.  If you have never canned before, I recommend that you read, Ball Complete Book of Home Preserving

It is a great source of information on diving into the world of canning and food preservation.


After your mix has finished simmering, use the funnel and a ladle to pour the mixture into one of your canning jars leaving a quarter inch of head space.  That is the space from the top of the jar to the top of the salsa inside the jar.  

Once you have your jars filled and sealed with a lid and band, submerge your filled jars into your boiling water bath.  Once the water returns to a rolling boil, then the clock begins.  Boil your jars for 45 minutes.

After 45 minutes, use your jar grabbers to remove the jars and place them on a cooling rack or towel to let cool.  You will know that your jars properly sealed if you hear them begin to pop.  That can take anywhere from a few minutes to a few hours depending on the contents of the jar.

If you find that your jar did not seal properly you can either try again, or place that jar in the fridge and consume within a couple of weeks.

And that's it!  You now have tasty salsa.


About the Author
Mike Podlesny is the author of Vegetable Gardening for the Average Person: A Guide to Vegetable Gardening for the rest of us. Be sure to join Mike`s vegetable seeds mailing list.


Watch the video below to learn more about Mike`s Seeds of the Month Club:

Wednesday, September 19, 2012

The Importance of Worms in your Home Vegetable Garden

Red Wigglers (Eisenia foetida)
You can do many things to and for your home vegetable garden to make it easier on yourself to maintain. Such things include a sprinkler system for watering and mulches for weed prevention. 

With that said there is one creature that you and your garden should not be without for such maintenance, and that is the worm. Well worms, plural, to be exact.

Worms provide a plethora of benefits. For instance, as they move about your soil they will consume a variety of things from organic matter, to the clay, silt and so on, and in turn give you castings. These castings, also called vermicompost, are filled with some of the greatest nutrients your plants will need to grow.


Join our leftover seeds mailing list

Besides the nutrients the castings provide for your soil and your plants, they are also good for making your soil more granular (more crumbly), which helps improve your soil's structure allowing air and water to move more freely.


As worms move around your soil, they also create tunnels.  These tunnels help aerate the soil underneath, and that is beneficial to plant roots, giving them a looser soil to grow and expand.


"Soil that has been well worked by worms can take in water four times faster than soil that hasn't," writes Edward C. Smith, in his book
The Vegetable Gardener's Bible.  "This reduces runoff and prevents water loss through evaporation from puddles that form when soil cannot absorb rainfall quickly enough."

To see if your soil has enough worms you can do a simple worm count by digging an area in your garden, one foot wide by one foot long by a half foot deep.  Turn the soil over and look for worms.  If you don't find any, your soil has issues.  You are looking for more than a dozen worms in that sized area that you dug up.


Don't panic if you don't find any or less than a dozen, it just means you have some work to do, to create an environment that is suitable for them.  Adding in plenty of organic matter (i.e. grass clippings, leaves, coffee grinds, egg shells etc.) will go a long way to building a healthy worm population. 


This will take some time and you must be consistent, because as soon as you stop feeding the worms, they are out of there.  You can speed this process up a little bit by purchasing some
red wigglers and adding them to your soil.  Even if you purchase the worms and add them in, you will still need to add organic matter to the soil to keep feeding them, otherwise they will leave as well.  

As long as you keep adding organic matter to your soil, you will be fine. 

About the Author 
Mike Podlesny is the author of Vegetable Gardening for the Average Person: A Guide to Vegetable Gardening for the rest of us. Be sure to join Mike`s vegetable seeds mailing list.

Watch the video below to learn more about Mike`s Seeds of the Month Club:

Tuesday, August 21, 2012

Grow Watermelons in your Garden, Vertically!

While I would be the first to admit that growing watermelons vertically isn't the best method, for many of us, when you lack space, you have to do what is best to get the results you are looking for.  

There is nothing wrong with growing watermelons vertically, you will just need to do a couple of extra steps to ensure that the watermelon has something to grow up and of course can be propped up.

Let's start with what you can use as a vertical support system.  If you have grown cucumbers, beans, or peas then you already have the experience needed for vertical watermelons.  You will simply use a trellis.

A trellis made from some wood or netting will work, but keep in mind the watermelon vines and the watermelon itself will get fairly heavy, so try to use something that can easily withstand their weight.  As you can see in the photo above I am using a lattice trellis made from pine wood and then stained with a water based outdoor stain.  This gives me the strength I need to support the vines, and of course the watermelon.
 
Be sure to join Mike`s vegetable seeds mailing list

This brings me to the support portion.  How do you support such a heavy fruit?  Well, there are a number of ways that I have seen it done, but the one that works best for me is a simple shelf.  

I took two pieces of old pine wood that I had in my garage and made an "L" shaped shelf.   One part of the shelf will attach to the trellis itself, I will get to more on that in a moment, and the other part will support the watermelon.


I took this step to the extreme and attached the two pieces of wood to make the shelving unit, using dove tail joinery.  If you have been following my blog you also know by now that I love woodworking as well.  This type of joint is very strong, and gets just some glue to keep the two pieces of wood together. 

You can use outdoor deck screws to attach the pieces as well, as that will hold also.  I try not to use nails as they are not as strong as screws or the dovetail joints....at least in my opinion.


I attached the shelving unit to the trellis using nothing more than two deck screws, long enough to go through the shelf and of course the trellis.  Try not to go all the way through the trellis as you will have the pointed end of the screw sticking out which could scrape you later. 


And that's it!  You can stain the shelf itself if you would like it to withstand the weather for a few seasons.  Pine does not wear well in the outdoors.  I did not preserve this particular shelf, but might sand it down and give it a couple coats of water based stain in the gardening off season.  We'll see.  I included another photo below of larger watermelons sitting on another shelf for support, attached to the same trellis.


About the Author
Mike Podlesny is the author of Vegetable Gardening for the Average Person: A Guide to Vegetable Gardening for the rest of us, the moderator for the largest vegetable gardening page on Facebook and creator of the monthly Seeds Club.

Watch the video below to learn more about Mike`s Seeds of the Month Club:

Friday, August 10, 2012

Turn Your Home Grown Cucumbers into Pickles

Have you ever grown your own cucumbers?  If so, then your next step of progression is to turn all of those wonderfully juicy cucumbers into great tasting pickles.  If you have never grown cucumbers, then this blog post should get you excited to do so, as you will see just how easy it is to turn those home grown cucumbers into great tasting bread & butter pickles.

I will say this.  I don't care what recipe you follow to make pickles, if you do not start with good fruits or veggies, your end product won't matter.  Canning will not make it taste better, only preserve the great taste it has to begin with.

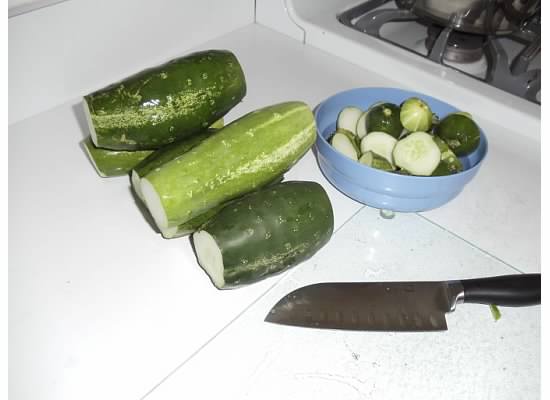
So for this exercise, let's start with some home grown cucumbers.  This year I grew Ashley cucumbers.  They yield plenty to work with and taste great.  Not the most ideal variety for pickling purposes, but adequate none the less.  If you want a great tasting, true pickling cucumber, go with the Boston variety.

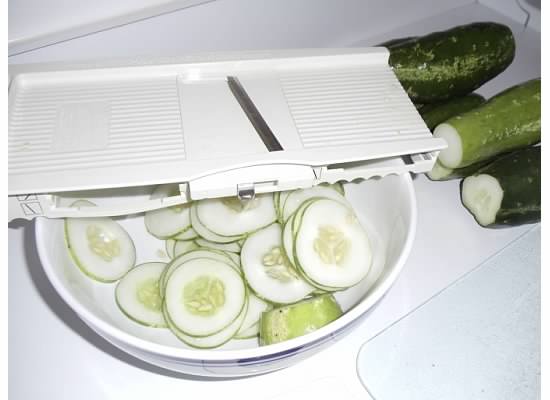
Once you have your cucumbers, slice off the ends as it makes it easier to have a flat surface of the cucumber to work with when using a mandolin slicer.  If you don't have a slicer, not to worry, simply use a sharp knife. 

I would have really liked to slice them with a "crinkle cut", but I did not have that attachment, so I settled for plain old flat.

The slicer I use has a nice feature where it "grips" the bowl that the slices go into.  This made it much easier to slice the cucumbers much faster.

I talked to a few people and they have electric slicers which work fast and well.  Probably a good idea to get one in the future if you plan on pickling loads of cucumbers as my friend does.

However, a simple mandolin slicer will do the trick.

I did not use a homemade recipe as I went the very easy route and used a pre-made mix.  For my pickles I chose Mrs. Wages Bread & Butter Pickles mix.  The recipe for this mix is as easy as it gets. 

You mix the dry ingredients in the pack with sugar and vinegar and then heat it up over the stove so everything will blend together.  Very simple!


Now go ahead and fill your jars.  Do not fill all the way to the top as you need to leave some room for head space.  

I filled mine up to just about where the jar starts forming into the mouth.

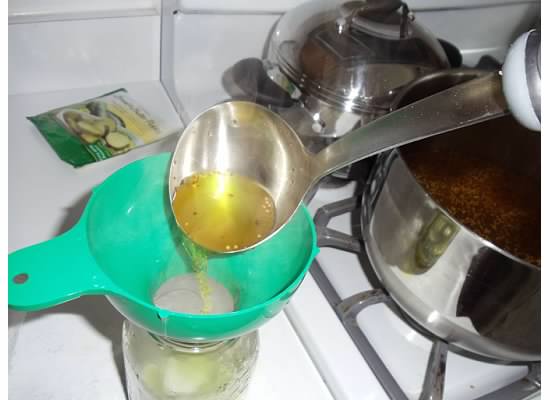
I also used my canning funnel to make sure none of the residue of the pickles touched the tops of the jar.  While not catastrophic if it does, it makes cleaning easier.
Now that your jars are filled with cucumbers, using a ladle, start pouring the hot pickling mixture into your jars.  Definitely use your funnel for this step.  

Fill the jars with the liquid leaving about a 1/4" of head space.  That is a 1/4" of space from the top of the jar where the lid will sit.

Once the jar is filled, make sure you remove as much air from between the cucumbers as possible by sliding a butter knife (or some other non sharp object) down inside the jar, moving the cucumbers off the side.

You can use the hot water bath method for this process.  I explain the hot water bath method, here, for tomatoes.  The process is the same.

The back of the mix packet will tell you exactly how long to heat this up for, which will be 35 to 45 minutes, depending on where you live as your locations altitude makes a difference.

And that's it!  Great tasting bread & butter pickles, made from cucumbers, right out of your garden.  Once you make these, and see how easy it is to do, you will never want to buy pickles from the store again.

About the Author 
Mike Podlesny is the author of Vegetable Gardening for the Average Person: A Guide to Vegetable Gardening for the rest of us, the moderator for the largest vegetable gardening page on Facebook and creator of the monthly Seeds Club.

Watch the video below to learn more about Mike`s Seeds of the Month Club:

Wednesday, August 1, 2012

Vegetable Gardeners, the End is Near! Are you Prepared?

Ok, take a deep breath. The end of vegetable gardening season is near its end. In the United States anyway. Our friends in the land down under are about to begin theirs. However, now that the season is nearing its completion have you been taking the steps and doing the things necessary to have your fresh, home grown veggies, even in the winter months?

One of the greatest thrills of growing your own food is the luxury of having healthy fresh food at anytime. Think about how wonderful it is, when you go to make your own marinara sauce and you can simply walk outside into your backyard (or wherever your garden is) and start picking the recipe’s ingredients literally seconds before they are used.

What happens though when those items are no longer in season? That’s the beauty of many techniques which make it possible to enjoy those home grown items all year round.

Let’s start with one of the simplest things you can do, to preserve that harvest. That would be blanching your veggies and freezing them. This technique works great with such items as potatoes, carrots, corn, beans and peas. Blanching simply means boiling your veggies in water for 2 to 5 minutes and then immediately removing them from the boiling water and submerging them into a bowl of ice water. The next step would be to freeze them in an airtight vacuum sealed bag. I own a Foodsaver so it makes this process easier, but there is a neat technique you can use if you do not own one. 


Fill a pot with cool tap water. Then grab a Ziploc freezer bag. Make sure the bag is open and place the bag into the water. Do not submerge the bag as you do not want any water to get into it. Now add your blanched veggies to the bag. As you fill the bag with veggies, because it is sitting in the water, the air will get pushed out the top. While this won’t eliminate all of the air, it will get rid of a lot of it and help with a longer freezer life and less burn. 


For fruits and veggies that have higher acidic contents (tomatoes, peaches etc) learn the water bath canning method. It requires nothing more than a few utensils, a large pot of boiling water, some canning jars and of course your time. I guarantee, that once you learn how to can your fruits and veggies, you will wonder why you did not do it sooner. Canning vegetables will give you the opportunity to take those home grown fruits and veggies and store enough for an entire year. Now that is being prepared!

When your jars have a good airtight seal, the food contents will stay fresh for up to a year . Which is perfect, because in a year’s time, you will be ready to grow more!

I’ll talk about pressure canning in a future post. This is for those items where a higher temperature is needed for proper removal of any and all harmful bacteria.

About the Author
Mike Podlesny is the author of Vegetable Gardening for the Average Person: A Guide to Vegetable Gardening for the rest of us, the moderator for the largest vegetable gardening page on Facebook and creator of the monthly Seeds Club.

Watch the video below to learn more about Mike`s Seeds of the Month Club:

Tuesday, July 31, 2012

Have you planned that fall vegetable garden yet?

The summer months are getting oh so much closer to the end. While the heat and humidity may not support that claim, the fact is, time is moving forward and eventually the summer vegetable gardening season will come to a close. That does not mean though that your gardening is over for the year. The use of a cold frame will still yield plenty of crops such as lettuce, spinach, kale, beets and chard well after Jack Frost nips at your nose.

Now is the perfect time to start planning that fall garden. Your mind is already on gardening with all of those tomatoes and cucumbers you are growing (or trying to grow), so get that pencil and paper out and start charting your course for the extended cooler weather season.

What I like to do is list the items that I am going to focus in on for the fall. Normally my inventory includes those items I mentioned previously plus a few more. I change it up from year to year just as I would for my spring/summer garden.

A lot of your leafy vegetables are excellent choices for the cooler months. I even read in an issue of Mother Earth News Magazine how a light touch of frost on your kale will enhance its flavor. I have not tried that myself, but if you do, or have, please let me know how it turned out for you.

A couple of good choices for quick growth include radish and turnips. They mature quickly and have great flavors. Keep an eye on some of those veggies you were meaning to start for the fall as we are at that point in time where you better get them started because they will need time to grow. Examples include rutabaga and spaghetti squash. If you use cold frames, the temperature won’t be as big an issue as sunlight will be, so get them started right away.

If you are like me, chances are you will be using the same garden areas in the fall that you used in the summer. The soil is going to be depleted with many nutrients, which does not necessarily mean you won’t be able to grow anything, it just means the growth could be stunted or the flavors of what you are growing won’t be as ideal.

After you remove your summer plants and before you plant your fall harvest, enrich your soil with the nutrients it needs. If you keep a compost pile, that would be perfect. Take your compost and mix it in. Don’t be afraid to add in some blood meal, fish emulsion or seasoned manure for your nitrogen, bonemeal for your phosphorous and seaweed, wood ash or green sand for your potassium. If you are going to add these items from store bought packages, be sure to pick items that contain other valuable nutrients as well, such as magnesium, calcium and so on.

But to reiterate, if you are keeping your own compost and better yet, vermicompost, then those items will give you just about everything your fall garden will need to thrive.


About the Author
Mike Podlesny is the author of Vegetable Gardening for the Average Person: A Guide to Vegetable Gardening for the rest of us, the moderator for the largest vegetable gardening page on Facebook and creator of the monthly Seeds Club.

Watch the video below to learn more about Mike`s Seeds of the Month Club:

Monday, July 9, 2012

Broccoli: From Seed to Harvest

Where do I begin with just how much better home grown broccoli tastes over store bought nameless varieties? Maybe I am a bit biased because I think everything I eat from my garden tastes better, but I am sure I am not alone with this assessment.

Not only is broccoli great tasting, but very easy to grow. In fact I have been growing it at home for the better part of 10 years, and I can not remember, at any time, where I struggled growing it once. Along with its ease of growth, the many nutrients broccoli provides, makes for a great addition to anyone’s garden.

Broccoli grows best in cooler weather, but you can still get great florets in warmer temperatures (more on that in a moment). I have achieved excellent results by starting my broccoli seeds indoors about eight weeks prior to the final frost in my area. During this time, if outdoor temperatures heat up during the day to above 50 degrees, I will move the plants outdoors in the full sun, to start the acclimation process.

I continually add compost to my soil all fall and winter long, so I know my garden, from a pH standpoint is ready to go, but it never hurts to take a reading just in case and adjust your soil as needed. Broccoli grows best when the soil’s pH is a little below 7 (neutral), in my own experience.

I have done well when I only grow a couple of plants, up through a near dozen, but one thing I have found where the broccoli really does well, and that is in a spot that receives full sun (at least 8 hours) throughout the day.

Your broccoli plant will grow a large head in the center of the plant. When it is dark green, looks firm and the buds are “tight”, it is ready to be harvested. Simply use a sharp knife and cut the head off. Do not pull out the plant. As mentioned earlier, even after the head is harvested and spring moves into summer, the plant will still produce small broccoli florets for a few more weeks. Although higher temperatures will send it to over ripen much faster, if you keep an eye on your plant, daily, you can grab plenty of extra for a lunchtime salad.

I have done well in the past, planting my broccoli near onions, celery, tomatoes, peppers, carrots and eggplant. Neither the broccoli nor the neighboring plants showed any adverse effects so it seems broccoli makes for a great companion to a lot of these plants and more as some on our facebook page have noted.

To be forewarned, broccoli will take up a lot of space, so if you utilize square foot gardening methods, most varieties of broccoli will take up two squares. Also, don’t be afraid to grow your broccoli in pots, containers or raised beds. It is the perfect plant for all of the above. They are very low maintenance. Just another reason why they should be part of your garden.

About the Author
Mike Podlesny is the author of Vegetable Gardening for the Average Person: A Guide to Vegetable Gardening for the rest of us, the moderator for the largest vegetable gardening page on Facebook and creator of the monthly Seeds Club.

Watch the video below to learn more about Mike`s Seeds of the Month Club:

Wednesday, April 18, 2012

Your Home Vegetable Garden, A Great Entomology Course

I am sure at some point in your life you had, even for a brief moment, some kind of science class where you studied insects, better known as entomology. Without going into great biological classification details, just know that insects make up the largest part of the Animalia Kingdom. So why is this important and what does it have to do with home vegetable gardening? Because there is such a wide variety of insects (in the millions) your home vegetable garden becomes a wonderful habitat for literally thousands of different species.

Besides the large number of species you can encounter, there are some amazing things that occur in your garden that you may not even notice, or are even aware of. For example, you can plant some broccoli which may attracts aphids. I’ll get into good and bad bugs in a moment. The broccoli is a food source for many species of aphids. In turn the aphids are a food source for ladybugs, however just because you have aphids does not necessarily draw in ladybugs, but you can see from the example the whole “circle of life” thing going on here.

This same example is replicated many times over with various insects and as your garden grows so does this process. This creates a perfect environment to walk and talk with your kids in the garden about not only the importance of what you are growing, but what you are seeing, and what happens on a smaller level. Think of it as a field trip to your backyard.

If you are skilled in the art of insect classification, that is wonderful, it will make the learning curve for your children that much easier, however, if you are like me, and have not memorized all of the one million plus insects in the world or even the few hundred thousand in your neighborhood, then there is a great tool you can use.

This handy tool, called Mac’s Field Guide, is available on Amazon. You will notice there a number of field guides to choose from as there is one for each part of the country. The guide is a large laminated sheet listing good garden bugs on one side and bad garden bugs on the other side. It doesn’t list every single insect you may encounter, it will list the most common ones that you will see in a typical home vegetable garden.

The simple definition of a bad bug is basically an insect that will eat or destroy your crops while a good insect will eat or destroy bad insects, contribute to the pollination process, etc.

When you know and understand the role of the insect you are looking at, it will help improve your home vegetable garden, as you know which insects should be removed and which ones you leave right where they are.

If your kids are anything like mine then you will see how amazed they are at how many insects they can identify from the field guide, and the questions they will ask. This backyard field trip will be educational for you and your children, and to think it’s not far away and you don’t have to pack a lunch.

About the Author
Mike Podlesny is the author of Vegetable Gardening for the Average Person: A Guide to Vegetable Gardening for the rest of us, the moderator for the largest vegetable gardening page on Facebook and creator of the monthly Seeds Club.

Watch the video below to learn more about Mike`s Seeds of the Month Club:

Wednesday, April 11, 2012

Adding Blueberries to your Home Vegetable Garden

If you have been following my blog, podcast or facebook posts then you already know that every year I love to add something new to my gardening adventures. I am a true believer in trying something new, even if it is just one plant, will greatly expand my knowledge and horizons when it comes to gardening.

This year will be no different. I will be adding to my garden, one blueberry plant. Living so closely to Hammonton, NJ, the self proclaimed, blueberry capital of the world, how could blueberries not be a part of my landscape?

Before I did though, I searched out some advice on growing them. While I believe growing new things every year is a good thing, not arming myself with the knowledge to have it succeed would be foolish. I quickly found out that blueberries love soil to be acidic. Regardless of the variety, 4.5 to 5.5 is the ideal pH range of the soil your blueberry plants should be grown in.

“As with many fruit producing plants, it is recommended to remove any flowers in the first year. This allows the plant to establish itself with a strong root system, and depending upon the age of the plant when purchased at the nursery, the plant may begin producing fruit for harvest the following year,” says Christy Wilhelmi, founder of Gardennerd.com and a member of the board of directors for Ocean View Farms. “I have read that most blueberries start producing in their third year, but I have seen plants produce the season after planting.”

After doing my research, here is what I have done for my own blueberry plant. I chose a location that receives full sun throughout the day. In my yard I have a corner near the back left side of my house that is perfect. Because of the way the sun shines and moves throughout the day, this particular spot is never shaded, making for plenty of sun for my new blueberry plant.

Next I removed the existing soil that was in that spot and created a mixture of topsoil, compost, peat moss and pine needles. “Blueberries grow best in acidic soil, so we tend to plant them in acid-loving plant mix (Master Nursery Garden Center's Nurseryman's line of products is our favorite), but we've also planted in straight peat moss with success,” says Christy.


With my soil all set (a pH reading of a little below 5), I planted my blueberry bush, propped up a 6 foot tall trellis behind it, that I will use as support when it gets larger, and finally put some fencing (about 24 inches high) around it, to protect it from the animals, just in case. You never know what the rabbits in my area will eat and I‘d rather not take the chance.

According to the nursery that I purchased the blueberry plant from, within 3 years it should yield about 15 pounds of fresh blueberries per season, for many years, so as long as I take good care of it. We shall see.


About the Author
Mike Podlesny is the author of Vegetable Gardening for the Average Person: A Guide to Vegetable Gardening for the rest of us, the moderator for the largest vegetable gardening page on Facebook and creator of the monthly Seeds Club.


Watch the video below to learn more about Mike`s Seeds of the Month Club:


Monday, April 2, 2012

Home Grown Tomatoes and their Contributions to your Health

Most people still refer to tomatoes as a vegetable even though botanically they are a fruit. Regardless of how you refer to them, one thing tomatoes can be called by everyone is good for your health.

Tomatoes are by far the number one vegetable, er um, fruit, grown in the home vegetable garden. Depending on which survey you have read, tomatoes outnumber its closest competitor by more than 3 to 1, which are cucumbers in one survey I read and peppers in another.

Who can argue adding them to your garden? They are easy to grow from seed, can be started indoors, and there are a wide variety of choices. With plenty of sun, fertile soil and regular waterings, you can have fresh home grown tomatoes all summer long (in most parts of the world).

There are a number of health contributions that adding home grown tomatoes to your diet can attribute to. For example, I recently had a chance to speak with board certified dermatologist and UCLA clinical professor, Dr. Tanya Kormeili.

“I like tomatoes because they are rich in lycopene- which helps reduce the number of free radicals. Free radicals cause aging, wrinkles and contribute to the DNA damage,” says Dr. Kormeili. “Additionally, they contain minerals, water, fiber and are a good source of vitamins A, B, C and E, which are important in skin health and also free radical protection.”

While Dr. Kormeili is a staunch supporter of adding home grown tomatoes to your diet for all the positives, she highly discourages the use of using tomatoes in a form of a topical face mask. She says doing this can cause sensitivity and rash, and that tomatoes should always be consumed and not applied.

So how should homegrown tomatoes be prepared in the kitchen? For this information I turned to Charis Freiman-Mendel, author of the book “Cook Your Way Through the S.A.T.”.

“Many vegetables lose their health potency if cooked, but not tomatoes,” Says Charis. “More carotenoids and flavonoids (also anti-inflammatory and fight allergies) are absorbed from cooked tomatoes than from raw tomatoes because cooking breaks them down and makes them more available to digestion.”

Here are some interesting points that Charis makes:

1. Cook tomatoes in olive oil to improve lycopene absorption. “Think bruschetta”, says Charis and if you need a recipe be sure to check Charis’ website at www.SATgourmet.com

2. Homegrown, especially organic, tomatoes have more nutrients, according to Charis, than conventional sit on the shelf varieties.

3. Tomatoes are low in calories. A perfect addition to any healthy eating plan.

4. Tomatoes are considered acidic which is undesirable, but it’s their acidic quality that helps fight urinary tract infections.

With all that tomatoes have to offer for your health, wouldn’t it make sense to grow at least grow a few plants at home? I believe so.


About the Author
Mike Podlesny is the author of Vegetable Gardening for the Average Person: A Guide to Vegetable Gardening for the rest of us, the moderator for the largest vegetable gardening page on Facebook and creator of the monthly Seeds Club.


Watch the video below to learn more about Mike`s Seeds of the Month Club:


Tuesday, March 6, 2012

Choosing the Right Tiller for your Home Vegetable Garden

My dad’s tool of choice for his garden was his trusty pitchfork, which he has since passed on to me. While I love using the pitchfork and digging in the dirt, nothing speeds up cultivating the soil faster than using a tiller. A good tiller will turn any large cultivating job into a quick one. However there are features and benefits you should be on the lookout for so that you do not pick the wrong one and get one that is either too small or too large for what you need.

The two types I am going to focus in on are front and rear tine tillers. There are also cultivators, which I will talk about in a future posting.

Front Tine Tillers
These types of tillers are designed for a small to mid sized garden that has been previously tilled, or had the ground broken. They will be able to break ground for a new garden if the conditions are ideal and that means the ground has be very soft. Such a condition would be after plenty of rain or a heavy soaking to an area.

As the name implies the rotating tines are in the front of the machine. Many of these require that you “pull” the tiller for best results, although there are models where you can push. Most, if not all variety and brands of front tine tillers have an OHV engine. This is a type of piston engine where rods are used to actuate rocker arms. Newer models could have an OHC engine, but the process of the tiller is still the same.

Popular features on front tine tillers include handle mounted tine engagement, adjustable tilling widths (as much as 24 inches), and an adjustable wheelbase. Not all brands will have these options so if they are important to you, then make sure you request them from the person selling you the tiller or read the box and/or product specs.

The benefits of a front tiller give you excellent power for tougher jobs and the tines in most models are self sharpening. The chain case in many varieties are enclosed therefore it is virtually maintenance free. With brands that offer an adjustable width, this will give you more versatility for varying conditions.

Rear Tine Tillers
As its name implies the tines are in the back of the machine. These types of tillers are designed for larger sized gardens and with the power they provide can tackle difficult jobs. They have large engines and like front tillers the chain case is sealed and comes pre-lubricated to reduce maintenance.

On many models the tines will counter rotate and that will help you break up the toughest of soils. They are also adjustable to various depths which will allow you to set your tiller to a preferred tilling depth. They have adjustable side panels which will keep tilled soil in a defined area and top notch brands of rear tillers will have large fourteen inch agricultural tires as well as a serrated trailing shield which smooths out the tilling path (this is an added feature, so make sure you ask for it).

There are many companies that make both types of tillers, so if you are brand specific with gardening tools, chances are your favorite, makes a tiller. Be sure to select a tiller that meets your needs, but not one that is too large for them either. If you have an eleven foot by eleven foot tiller, you won’t need a rear tine model as a front tine tiller will do (you get the point). Also be sure to check what type of engine for fuel it takes. They usually are either 2 stroke or 4 stroke engines. To read more on how these engine types differ be sure to do Google search on “2 stoke engine 4 stroke engine differences”.


About the Author

Mike Podlesny is the author of Vegetable Gardening for the Average Person: A Guide to Vegetable Gardening for the rest of us, the moderator for the largest vegetable gardening page on Facebook and creator of the monthly Seeds Club.

Watch the video below to learn more about Mike`s Seeds of the Month Club:

Tuesday, November 22, 2011

5 Home Grown Vegetables for Thanksgiving


The holiday season is upon us which for our family kicks off with Thanksgiving. Thanksgiving is that one day out of the year where we recognize how lucky we are to have our health, family and friends around our dinner table and of course the gratefulness that even in these tough economic times we can still put a nice meal on the table to enjoy the day.

One thing I am personally thankful for is for the day my dad taught me how to vegetable garden, how you can grow your own food and that it is easier then you think. It is a skill that I can pass along to my two sons and hopefully they pass along to their children one day.

Being able to grow our own food not only puts healthy, fresh fruits, vegetables and herbs on our table but we are able to donate a lot of food to local food pantries and needy families, so my family is very thankful that we can do that as well.

What I wanted to do is give you a list of the fresh items that I will be serving on my Thanksgiving table this year.

Green Beans
A fellow vegetable gardening member on our Facebook page recently sent me a message about the green beans he grew this past season. To make sure he grew enough he had ten Kentucky Wonder pole bean plants growing up on a home made trellis. Of course if you know anything about pole beans in general you immediately say to yourself, “Good Lord, 10!” That is because they produce and produce and produce and keep going. They make the energizer bunny look inferior once they start growing. He even said, “my neighbors stopped answering their doors because they didn’t want anymore.” That is how many ten plants will yield. Beyond that, for my family, the Thanksgiving dinner table would be incomplete without the green bean casserole. With home grown green beans the casserole tastes so much better (at least it does to me).

Celery
I will be the first to admit that celery is not the easiest item to grow. The seeds are so tiny that they are nearly impossible to work with. Most of the time when I start my celery seeds I end up planting a lot per each starter cup, which I then I have to trim back. However, once you are able to get the celery going, fresh celery mixed in with the stuffing is fantastic. Also, I have inherited a family recipe from my mom called stuffed celery. Not sure if she got it from somewhere or made it up herself, but it’s nothing more than cream cheese mixed with chopped up gerkin pickles and green olives. Take that mix and fill the celery. Something about the crunch of the celery with that mix is such a great taste.

Salad Greens
This is my generalized category for all items such as lettuce and spinach that would be included in my salad. I will be literally having the freshest salad come Thanksgiving day. That is because greens such as lettuce and spinach will grow well into the cooler months of November and with a well built cold frame you can easily get fresh greens all winter long. Imagine being able to pick your Thanksgiving day salad 10 to 20 minutes before you serve it.

Pumpkin Pie
Ok we aren’t actually growing pumpkin pies here, but we can grow the main ingredient in a pumpkin pie recipe and that is the pulp to be used. Everyone has their favorite pumpkin and/or squash they grow for this purpose and I am no different. I like the Blue Hubbard Squash. The pulp inside, once cooked and pureed, makes for a nice sweet addition to any pumpkin pie recipe. Sugar Pie Pumpkin is another good one as well.

Potatoes
What would be Thanksgiving day dinner without the different varieties of potatoes that will be served. From sweet to my wife’s garlic mashed red recipe, home grown potatoes are an excellent way of bringing what you grow at home to your dinner table. I would not consider potatoes a difficult crop to grow in my area, and they can be left in the ground until you plan on harvesting them for consumption (in many cases).

I can list a lot of other items that I have served in the past as well as I am sure you and your family have your favorites as well. Enjoy your home grown Thanksgiving!

About the Author
Mike Podlesny is the author of Vegetable Gardening for the Average Person: A Guide to Vegetable Gardening for the rest of us, the moderator for the largest vegetable gardening page on Facebook and creator of the Seeds Club.

Watch the video below to learn more about Mike`s Seeds of the Month Club: