Showing posts with label grow. Show all posts

Wednesday, June 5, 2013

Grow Your Best Peppers Yet!

I do very well here in New Jersey growing peppers. For the past two season, I have had peppers grow (and thrive) well into November, even after a couple of frosts also with no cover protection.

I grow a lot of sweet peppers and some hot peppers, but as a total, I grow a boatload of peppers. Enough to share with the neighborhood my wife tells everyone.

With that said, I wanted to share some of my tips on peppers, that I believe has lead me to have such great pepper harvests. Of course I can’t control the weather in the cooler months that would do peppers harm, I do believe that by using these tips, I am able to have my peppers grow very hardy, and that helps out a great deal.

Your Site
As with any other fruit or vegetable plant, peppers are no different, and that is, good peppers start with an excellent foundation. In this case, the foundation for your peppers is the soil itself. Obviously some might disagree and say “no, Mike, it starts with the seeds you use”. While I do agree with that statement, that good peppers start with seeds from a reputable company (or a friend), I am assuming that you have already completed that step.

Before you plant your pepper transplants (or direct pepper seeds), make sure to mix in plenty of compost. I like to do a mix of compost from my compost pile, vermicompost from my worm bin, and seasoned livestock manure (cow manure). I would like to add that I use so much vermicompost that I added a worm tower this year to my yard and plan on adding another worm tower next season. They can be a bit pricey.

As a side note. If you started your peppers from seeds indoors, be sure to harden them off, that is acclimate them to the outdoors before you plant them in your garden bed.

Bring the Heat
Pepper plants love heat. Which bodes well for us here in New Jersey, because around July to August, between the heat and humidity, it can become unbearable for humans in the summer. If you live in a cooler climate, you can always help increase the temperatures around the plant using cold frames, greenhouses and so on. You want to keep the temperatures for your pepper plants above 60 degrees Fahrenheit (roughly 16 degrees Celsius).

Spacing
Peppers are abundant producers when given plenty of space. You may produce bigger or more quantities of peppers if you grow just a few, spaced out wider. With that said, I have done well spacing them out eight to ten inches, although one gardening friend of mine has his spaced out further (more like 12 to 16 inches), and does great.

Care
Keep your pepper area weed free. I like to use newspaper as a weed barrier, then place some straw on top of that. I won’t go into all of the benefits of using straw in the garden, but in this case it further helps keeping the weeds at bay.

Be sure that your pepper plants receive plenty of water in the early stages and then a maintenance watering of at least 1 to 2 inches of water weekly. Water a little more often if your conditions are extremely dry and/or hot.

The straw we used a couple of paragraphs up also help in retaining moisture in the garden.

To build a healthier, sturdier plant, pinch off the first few flowers in the early going. You want your pepper plants to direct their energy towards growing the pepper plant itself, not peppers just yet. This will pay big dividends later in the season.

Harvest and Enjoy
Once your peppers reach their full maturity, gently pluck them from the plant making sure you don't damage the plant itself. Some people like to use scissors to cut the stem, me I will simply pull the pepper with one hand while holding the branch that it is on with the other hand. Whatever works for you!

Wednesday, May 29, 2013

Make Your Own Inverted Tomato Planter

By now you have probably seen those inverted tomato planters. You are probably also wondering if they really work. The answer in short is yes. So as long as you give the tomato plant plenty of sun, water, and room for their roots to grow, it will work.

However, did you also know that you can build your own upside down planter with some basic material and of course a tomato plant? Well, you can. Here is a great step by step instructional to do just that.

If you are short on garden space, but have a lot of hanging space, then this is yet another tool for you to use to expand what you can grow, by utilizing vertical area you may not have thought you had.

Here are the Step by Step instructions

Tuesday, April 9, 2013

How to Make a Slanted Shelf for Canned Food Rotation

Do you like to can the food you grow? If so, then you probably already know about your storage needs and of course rotating your food so that you are consuming the varieties that have been around the longest.

Here is a great idea from LDS Intelligent Living!. A slanted storage shelf that you can build yourself with some supplies found out any home or garden center for just a few bucks.

There is plenty of room to store all of your items and the best part, because it is slanted, as you remove jars from your shelves, the remaining items will slowly move their way down to the front. You simply add the new supplies to the back!

Here are the Step by Step instructions

Tuesday, December 4, 2012

Growing Parsnips

Parsnips are a great addition to many recipes. Once cooked, parsnips have a sweeter flavor then their close cousin, the carrot. Parsnips also are at their best flavor when harvested after the first frost.

While you can eat parsnips raw, they taste much better once they are cooked. Parsnips are most commonly used in soups, stews and casseroles, although you are only limited with your use of your home grown parsnips from what you can imagine.

Parsnip seeds take longer to germinate than most other root crops, as much as fourteen days. Even though you can start parsnip seeds indoors, it really does not make much sense to do so, since you can start parsnip seeds outdoors after the last frost and grow your parsnips straight through after the first frost in the autumn months.

Parsnip seeds are larger than carrot seeds, making planting and spacing of parsnip seeds much easier to do. And because parsnip seeds are larger you can plant them a half inch deep. When planting your parsnip seeds make sure you space them out every four to six inches. You can also plant three to four parsnip seeds to a location and when the parsnips are three to five inches, you can thin your parsnips out every six inches or so.

As mentioned earlier, allow your parsnips to grow straight through the spring, summer and autumn months. Once you have had your first frost of the season, your parsnips will be at their best flavor and ready to be harvested. To harvest your parsnips, simply use a trowel to loosen the soil around them, making them easier to pull from the ground.

Parsnips store well in the fridge. After you harvest your parsnips, be sure to clean and dry them and store them in a Ziploc storage bag. Your parsnips will store for three to six months and even longer. Don’t forget to look up some recipes for your parsnip greens also.

While your parsnips are growing make sure they receive an even watering, and choose a location that receives full sun (although they tolerate light shade). Parsnips make for great companion plantings to bush beans, garlic, onions, peas, peppers, potatoes and radish. However, keep your parsnips away from caraway, carrots and celery.

Thursday, September 13, 2012

Grow Spinach from Seeds

Spinach is one of the healthiest leafy greens you can eat. It is loaded with plenty of vitamins and minerals that all doctors and nutritionists would recommend. So why not add this healthy tasty treat to your home vegetable garden?  Besides its health benefits, spinach is easy to grow from seed and in many areas of the world and you can get many harvests from the same plant as well as planting during the spring and winter months.

As long as temperatures are cool to moderate, you will be able to grow spinach. Don’t fear if you live in climates where it gets very cold, you can always add in a cold frame to protect your plants from the frigid winds. However if it gets too hot, 85 degrees or above, you are going to have issues with keeping the plants going if the temperatures remain at that level.


Join our leftover seeds mailing list


Make sure you pick a spot where it gets at least 5 hours of sunlight daily. More would be better, but many varieties tolerate light shade as well, which makes spinach a perfect fall crop when the days are shorter.

Plant your spinach seeds no deeper than a half inch. Any deeper and they may have trouble during the germination process. Plant multiple seeds together, then once they germinate thin out the plants to one plant per every six inches. If you find that you germinated more then your space allows, be sure to toss the extras into your next salad. They taste great!

When the outer leaves on your spinach plants reach six to eight inches in length they are ready to harvest. Simply cut them off with a sharp pair of scissors. Do not pull out the entire plant as it will keep producing as long as you only harvest the leaves. This allows those with limited space to yield plenty of spinach from just a few plants.

Expect your spinach plants, when you grow them directly from seed to take anywhere from 45 to 70 days to fully mature. Sometimes sooner under optimal conditions.

Spinach is a great source of calcium, iron, vitamins A, B and Niacin. If you were looking to get more of these nutrients into your healthy eating plan, be sure to grow some spinach from seeds right in your backyard.

About the Author
Mike Podlesny is the author of Vegetable Gardening for the Average Person: A Guide to Vegetable Gardening for the rest of us. Be sure to join Mike`s vegetable seeds mailing list.

Watch the video below to learn more about Mike`s Seeds of the Month Club:

Wednesday, September 5, 2012

Labor Day has Passed, Now onto Some Fall Gardening

Many vegetable gardeners get bummed out because Labor Day marks the end of summer and that usually means, cooler weather is not too far off, translating into the end of growing fresh fruits and vegetables. However, gardening in the cooler months is just as fun as the summer months.

The cooler months yield a chance to grow all sorts of great veggies. Carrots, radish, kale, peas, lettuce, spinach, beets, turnips and broccoli make up just a few of the many choices you have. Throw in a cold frame over your garden beds and your growing possibilities become nearly limitless.

Be sure to join Mike`s vegetable seeds mailing list
 
Of course, growing tomatoes, beans, peppers and cucumbers more than likely won’t work in your area when the temps begin to drop, autumn is great time to continue to grow.

For many of you, like me, you will need to remove some of your summer plants. If they are still producing, you of course would not do this, but if they are not, now is a good time, to go ahead and discard them into your compost pile.

Now that you have an area to plant in, you will want to replenish the ground with plenty of nutrients, and the best way to do that, is mixing in some of your finished compost. The more you have to mix in, the better off you will be.

Of course, if you don’t have enough compost to go around, or you did not get one started this year, there are plenty of organic fertilizers on the market that you can use to help along with your growing process.

One of my favorites is Annie Haven’s Authentic manure tea bags. They are small tea bag looking products filled with seasoned manure that you steep in water, then water your plants with. It works great, and is fairly inexpensive for how much use you get out of the tea bags.

So before you give up on your gardening for the season and grab some of those vegetable seeds that work well in the early spring, because they are going to do great in the fall as well!

About the Author
Mike Podlesny is the author of Vegetable Gardening for the Average Person: A Guide to Vegetable Gardening for the rest of us, the moderator for the largest vegetable gardening page on Facebook and creator of the monthly Seeds Club.

Watch the video below to learn more about Mike`s Seeds of the Month Club:

Tuesday, August 21, 2012

Grow Watermelons in your Garden, Vertically!

While I would be the first to admit that growing watermelons vertically isn't the best method, for many of us, when you lack space, you have to do what is best to get the results you are looking for.  

There is nothing wrong with growing watermelons vertically, you will just need to do a couple of extra steps to ensure that the watermelon has something to grow up and of course can be propped up.

Let's start with what you can use as a vertical support system.  If you have grown cucumbers, beans, or peas then you already have the experience needed for vertical watermelons.  You will simply use a trellis.

A trellis made from some wood or netting will work, but keep in mind the watermelon vines and the watermelon itself will get fairly heavy, so try to use something that can easily withstand their weight.  As you can see in the photo above I am using a lattice trellis made from pine wood and then stained with a water based outdoor stain.  This gives me the strength I need to support the vines, and of course the watermelon.
 
Be sure to join Mike`s vegetable seeds mailing list

This brings me to the support portion.  How do you support such a heavy fruit?  Well, there are a number of ways that I have seen it done, but the one that works best for me is a simple shelf.  

I took two pieces of old pine wood that I had in my garage and made an "L" shaped shelf.   One part of the shelf will attach to the trellis itself, I will get to more on that in a moment, and the other part will support the watermelon.


I took this step to the extreme and attached the two pieces of wood to make the shelving unit, using dove tail joinery.  If you have been following my blog you also know by now that I love woodworking as well.  This type of joint is very strong, and gets just some glue to keep the two pieces of wood together. 

You can use outdoor deck screws to attach the pieces as well, as that will hold also.  I try not to use nails as they are not as strong as screws or the dovetail joints....at least in my opinion.


I attached the shelving unit to the trellis using nothing more than two deck screws, long enough to go through the shelf and of course the trellis.  Try not to go all the way through the trellis as you will have the pointed end of the screw sticking out which could scrape you later. 


And that's it!  You can stain the shelf itself if you would like it to withstand the weather for a few seasons.  Pine does not wear well in the outdoors.  I did not preserve this particular shelf, but might sand it down and give it a couple coats of water based stain in the gardening off season.  We'll see.  I included another photo below of larger watermelons sitting on another shelf for support, attached to the same trellis.


About the Author
Mike Podlesny is the author of Vegetable Gardening for the Average Person: A Guide to Vegetable Gardening for the rest of us, the moderator for the largest vegetable gardening page on Facebook and creator of the monthly Seeds Club.

Watch the video below to learn more about Mike`s Seeds of the Month Club:

Friday, August 3, 2012

How to Can your Home Grown Tomatoes

Growing your own food is a thrill.  You will feel a tremendous sense of accomplishment.  Whether you start from seed or get some plants from a local nursery, when you take a bite out of that first home grown tomato, you will never want to eat a store bought one again.

But what happens when gardening season ends?  This is where storage comes into play.  I recently wrote a few articles on basic storing methods, but in this article I want to give you specific steps to "can" those home grown tomatoes using the water bath method.


The canning items you will need are the following:
  • Some canning jars.  These are available for about $9 to $14 per dozen, depending on the size.  They come in pints and quarts as well as wide mouth and narrow mouth.  For this article, I am using quart sized jars with narrow mouths.
  • Jar bands and lids.  These usually come with the jars, however the lids are not reusable.  I'll get to more on that in a moment.
  • Some utensils.  These will include a lid grabber, which is nothing more than a stick with a magnet on it, a jar grabber, and a funnel.
  • You will need a large pot that is deep enough to put the jars in and have at least one inch of water on the top.  Many places sell a pot/utensil combination kit for $30 to $50.
Items that you will need that you may have around your house already, but will need:


  • Lemon Juice
  • Salt (optional)
  • Tablespoon
  • Teaspoon
  • 2 pots, 1 for hotwater, 1 for ice water
  • Tongs to grab the tomatoes
  • A ladle for the hot water you will add to the jar


For this article I chose roma tomatoes that I grew in my garden.  The steps are the same for any tomato, but the romas are perfect for marinara sauce.  I like my beefsteak tomatoes for salsa.  I'll save that for a seperate article.

Be sure to join Mike`s vegetable seeds mailing list


STEP 1 - Peel the Tomatoes
While you don't absolutely have to remove the skins, your tomatoes will taste much better later on when you go to use them.


The simple way to remove the skins is through the blanching process.  Bring a pot of water to a boil.  Once the water is boiling, drop your tomatoes into the pot for 45 seconds.  You will see the skins on the tomatoes start to crack and seperate.
After 45 seconds, start removing the tomatoes with your tongs and immediately plunge them into another pot filled with ice water.


Now you are ready to start peeling the tomatoes.  There is no real science to this.  Just use your fingers and hands, and start peeling away.  I like to keep a bowl nearby to throw the peels into.  I will then throw those peels into my compost bin.  Nothing goes to waste!  Or at least I try to make sure nothing goes to waste.


STEP 2 - Add Some Ingredients

To your empty jar, add two tablespoons of lemon juice and 1 teaspoon of salt.  The salt is optional.  Meanwhile, before you get to the next step, get a pot of water going on the stove.  You will add the hot water to your jar in a later step, but you need this for the liquid to add to your lemon juice.  Some recipes I have read said make sure it is boiling, while others said it only needs to be hot.  I just heated mine up.  Never brought it to a boil and it works fine for me.

STEP 3 - Put the Tomatoes in your Jar
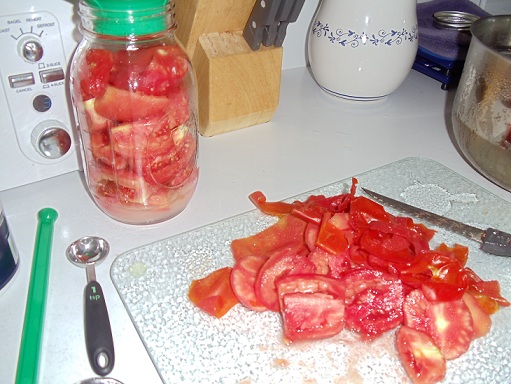
How you can your tomatoes is up to you.  Some people like to can them whole, while me personally I cut them in half.  The choice is yours and the process is still the same.


Using your funnel (which helps keep tomato residue off the lids and sides of the jar), start putting your tomatoes in your jar until the jar is filled.  Make sure you take up as much space as possible.  DO NOT FILL ALL THE WAY TO THE TOP.  Leave about 1/4" of head space (space between the top of the tomatoes and the top of the jar.
STEP 5 - Add hot water
Take a large spoon or ladle and start taking water from your pot of hot water (from step 2), and slowly add it to your jar of tomatoes.  In between each ladle of water, use a butter knife or a spoon and gently slide it down the inside sides of the jar to help release any air trapped between the tomatoes.  Fill the jar with hot water leaving a 1/4" of head space.

STEP 6 - Add your jar to the water bath

Place your jar of tomatoes in your large pot of hot water.  As you can see in the picture, the pot that I am using comes with a basket with handles which makes it easier to put many jars on and then lower the basket into the hot water.  It also allows for space underneath the jars inside the pot as well.


STEP 6 - Remove the Jars


Pints will need to be in the hot water for 35 minutes, quarts for 45 minutes.  If you live in areas of higher elevation you should add another 10 to 15 minutes.Once the the time has elapsed, use your handy jar grabbing tongs, and remove the jars from the hot water bath and place them on a cooling rack. 

Leave the jars there to cool for 12 to 24 hours.  You will hear a "pop" sound when it completely seals.  This usually occurs within the first few hours.  If after 12 hours you did not hear the pop, or you can easily push the center of the lid of the jar in and out, then it means the jar did not seal properly.

I have read you have up to 24 hours to attempt to reseal, however at that point I simply just consume the contents of the jar within 3 days since I try and do all of my canning in a single day.  I'd hate to start all over again for a single jar.  The choice is yours.

And that's it!  Store away in a cooland dry location out of the way of any sunlight.  Basements work best for this.


About the Author Mike Podlesny is the author of Vegetable Gardening for the Average Person: A Guide to Vegetable Gardening for the rest of us, the moderator for the largest vegetable gardening page on Facebook and creator of the monthly Seeds Club.

Watch the video below to learn more about Mike`s Seeds of the Month Club:

Tuesday, July 31, 2012

Have you planned that fall vegetable garden yet?

The summer months are getting oh so much closer to the end. While the heat and humidity may not support that claim, the fact is, time is moving forward and eventually the summer vegetable gardening season will come to a close. That does not mean though that your gardening is over for the year. The use of a cold frame will still yield plenty of crops such as lettuce, spinach, kale, beets and chard well after Jack Frost nips at your nose.

Now is the perfect time to start planning that fall garden. Your mind is already on gardening with all of those tomatoes and cucumbers you are growing (or trying to grow), so get that pencil and paper out and start charting your course for the extended cooler weather season.

What I like to do is list the items that I am going to focus in on for the fall. Normally my inventory includes those items I mentioned previously plus a few more. I change it up from year to year just as I would for my spring/summer garden.

A lot of your leafy vegetables are excellent choices for the cooler months. I even read in an issue of Mother Earth News Magazine how a light touch of frost on your kale will enhance its flavor. I have not tried that myself, but if you do, or have, please let me know how it turned out for you.

A couple of good choices for quick growth include radish and turnips. They mature quickly and have great flavors. Keep an eye on some of those veggies you were meaning to start for the fall as we are at that point in time where you better get them started because they will need time to grow. Examples include rutabaga and spaghetti squash. If you use cold frames, the temperature won’t be as big an issue as sunlight will be, so get them started right away.

If you are like me, chances are you will be using the same garden areas in the fall that you used in the summer. The soil is going to be depleted with many nutrients, which does not necessarily mean you won’t be able to grow anything, it just means the growth could be stunted or the flavors of what you are growing won’t be as ideal.

After you remove your summer plants and before you plant your fall harvest, enrich your soil with the nutrients it needs. If you keep a compost pile, that would be perfect. Take your compost and mix it in. Don’t be afraid to add in some blood meal, fish emulsion or seasoned manure for your nitrogen, bonemeal for your phosphorous and seaweed, wood ash or green sand for your potassium. If you are going to add these items from store bought packages, be sure to pick items that contain other valuable nutrients as well, such as magnesium, calcium and so on.

But to reiterate, if you are keeping your own compost and better yet, vermicompost, then those items will give you just about everything your fall garden will need to thrive.


About the Author
Mike Podlesny is the author of Vegetable Gardening for the Average Person: A Guide to Vegetable Gardening for the rest of us, the moderator for the largest vegetable gardening page on Facebook and creator of the monthly Seeds Club.

Watch the video below to learn more about Mike`s Seeds of the Month Club:

Monday, July 30, 2012

Growing Carrots from Seeds - Perfect for Kids

While I can not say that what I am about to tell you will make your kids devour carrots like a hungry rabbit, it should at least get them excited about growing and harvesting them. On a side note, sort of on topic, ironically, I have put some carrots out for the rabbits and they won’t eat them, only the carrot greens. The squirrels on the other hand, well, they will eat just about anything.

Here is how I got my two boys excited about growing carrots. I will get into a little trick my wife uses to actually get them to eat the carrots, a little bit later.

I built and dedicated a four foot by four foot raised bed, made from landscaping timbers that are readily available at any home center for a few bucks, for my kids’ carrot growing adventures. There is nothing fancy about this raised bed, as you can see. It is a simple square, two layers of timbers high.

Once the raised bed garden is built, you will need to add in some soil. Your options really are limitless here with any of the organic soil varieties available at garden centers, to the “create your own” methods. One thing's for sure, since carrots are a root crop you will want to have soil that is loose and friable. It will allow your carrots to grow more freely and give their roots a chance to spread out.

Your bed is set up, you have your soil in the bed, now comes the time to plant the seeds. Two years ago I gave my sons a couple of packs of carrot seeds and told them to go ahead and have fun. While they enjoyed that very much, the bed had carrots everywhere and some too close together. Neither issue resulted in a less tasty carrot or reduced amount of fun, but we did make some changes for this year.

Instead, for this year, we created rows for 5 different varieties of carrots and spread the rows apart about seven to eight inches. I had them lightly sprinkle each variety of seeds in their marked row, making sure we did not overseed any particular spot. I was keeping a close on the project (sort of).

So, as you can imagine, up to this point, from working with wood, to playing with dirt, to planting seeds, they were having a ball. What kid wouldn’t like getting dirty right?

Once everything was planted I would go out to the raised bed with my sons every other day or so and help them pick any weeds, making sure they understood, the raised bed, was for carrots only. My way of convincing them that weeding was a good thing.

Fast forward a couple of months and the raised bed is filled with carrots. I think the big thrill for kids about carrots, or so it seemed to me by watching my sons, was the fact they could not actually see how big the carrot is until they pulled it. This also presented a slight problem because if my older son picked a carrot and it was huge, and my younger son picked one and it was smaller, my younger son would want to keep picking until he had the larger carrot. I was constantly on “do not pick too many” patrol.


Now that they have had so much fun picking carrots, how do you get your kids to eat them? My wife likes to shred the carrots and add them to just about everything she cooks. It keeps the pieces small, and when cooked, they soften up so it makes it easier for them, I suppose. 

I'll write about the onion bed in a future post :-)

About the Author
Mike Podlesny is the author of Vegetable Gardening for the Average Person: A Guide to Vegetable Gardening for the rest of us, the moderator for the largest vegetable gardening page on Facebook and creator of the monthly Seeds Club.

Watch the video below to learn more about Mike`s Seeds of the Month Club:

Friday, July 27, 2012

Starting Vegetable Seeds Indoors

If the weather in your area of the world is anything like mine, then chances are there are many varieties of vegetables that you simply can not start from seeds directly outdoors. This is because the amount of time you would have from the moment the weather “cooperates” until the day when the weather no longer “cooperates” isn’t very long.

Take for example tomatoes. Most tomato varieties require anywhere from 70 to 90 days for full maturity. There are a lot of places that do not have the 70 days, let alone the 90. So what can a vegetable gardener do to overcome this?

There is one basic solution to this dilemma and that is to start your seeds indoors. Sounds like a no-brainer right? But before you just shrug off this as being common knowledge, lets take a look at what you need to do in order to maximize the chances of your indoor seeds actually being productive for the outdoors.

Let’s start with the soil for your needs. There are a variety of seed starting soil mixes on the market available at any home or garden center for just a few bucks (depending on how much you buy). These work fine. What you want is a soil that is very loose and filled with nutrients. So be sure to read the package if you decide to buy a pre-made mix and read what it contains. Peat and perlite will more than likely be the two top ingredients as peat is friable and gives the soil its looseness and the perlite helps with improved aeration and better drainage. They will differ on the nutrient end of things as organic seed starters will contain compost and protein meal whereas non-organic will contain chemical combinations for the appropriate N-P-K (nitrogen - phosphorous - potassium) needs of seeds.

You can always create your own seed starting mix as well, and if you have your own compost pile, I would highly recommend it since you know what your compost is made out of. Equal parts peat, perlite and compost should suffice and if you want to go even “greener”, substitute coir for peat. Coir is coconut husk and is just as friable as peat, just a bit more expensive.

Next you will need something to put the soil in. Here your possibilities are endless. You can go with trays, up through plantable pots, reuse old cottage cheese containers, you name it. The choice is really yours. I find using plantable cell flats are much easier, but I also use some leftover yogurt cups, with holes drilled into the bottom for drainage, as well.

Using warm water, I like to water the soil first before I put it into any pots and plant any seeds. I feel it makes it easier to work with. A bit messier, but easier to work with. Just make sure when you water the soil, you do so in a container that has plenty of drainage. You want your soil moist, not saturated.

Fill your pots, cell flats or whatever it is you have chosen with the moist soil. Poke holes to the depth that is needed for the seeds you are planting, drop the seeds in and lightly cover.

Your seeds will need plenty of sun and a good germination temperature. For me, I place my seed starters on or near the windows of my house that receive the sunlight first thing in the morning. This gives them the most exposure of sunlight throughout the day.

For germination temperatures, I like to use a propagation dome on all my seed trays. This helps keep a constant, warm temperature for the seeds and helps not only ensure the seeds will germinate, but do so rather quickly. Once in awhile we will get lucky in our area and have a 65 to 75 degree day when the average temperature is under 50. If this happens for you, don’t be afraid to take the seeds outside and into the full sun. This practice especially comes in handy when you need to start hardening your plants off.

Once your seeds germinate, you will want to keep an eye on them. When they get larger you will need to move them to bigger containers so their growth will continue, and the new soil, in its new container will have more nutrients for the young plant to take advantage of.

About the Author
Mike Podlesny is the author of Vegetable Gardening for the Average Person: A Guide to Vegetable Gardening for the rest of us, the moderator for the largest vegetable gardening page on Facebook and creator of the monthly Seeds Club.
Watch the video below to learn more about Mike`s Seeds of the Month Club:

Monday, July 9, 2012

Broccoli: From Seed to Harvest

Where do I begin with just how much better home grown broccoli tastes over store bought nameless varieties? Maybe I am a bit biased because I think everything I eat from my garden tastes better, but I am sure I am not alone with this assessment.

Not only is broccoli great tasting, but very easy to grow. In fact I have been growing it at home for the better part of 10 years, and I can not remember, at any time, where I struggled growing it once. Along with its ease of growth, the many nutrients broccoli provides, makes for a great addition to anyone’s garden.

Broccoli grows best in cooler weather, but you can still get great florets in warmer temperatures (more on that in a moment). I have achieved excellent results by starting my broccoli seeds indoors about eight weeks prior to the final frost in my area. During this time, if outdoor temperatures heat up during the day to above 50 degrees, I will move the plants outdoors in the full sun, to start the acclimation process.

I continually add compost to my soil all fall and winter long, so I know my garden, from a pH standpoint is ready to go, but it never hurts to take a reading just in case and adjust your soil as needed. Broccoli grows best when the soil’s pH is a little below 7 (neutral), in my own experience.

I have done well when I only grow a couple of plants, up through a near dozen, but one thing I have found where the broccoli really does well, and that is in a spot that receives full sun (at least 8 hours) throughout the day.

Your broccoli plant will grow a large head in the center of the plant. When it is dark green, looks firm and the buds are “tight”, it is ready to be harvested. Simply use a sharp knife and cut the head off. Do not pull out the plant. As mentioned earlier, even after the head is harvested and spring moves into summer, the plant will still produce small broccoli florets for a few more weeks. Although higher temperatures will send it to over ripen much faster, if you keep an eye on your plant, daily, you can grab plenty of extra for a lunchtime salad.

I have done well in the past, planting my broccoli near onions, celery, tomatoes, peppers, carrots and eggplant. Neither the broccoli nor the neighboring plants showed any adverse effects so it seems broccoli makes for a great companion to a lot of these plants and more as some on our facebook page have noted.

To be forewarned, broccoli will take up a lot of space, so if you utilize square foot gardening methods, most varieties of broccoli will take up two squares. Also, don’t be afraid to grow your broccoli in pots, containers or raised beds. It is the perfect plant for all of the above. They are very low maintenance. Just another reason why they should be part of your garden.

About the Author
Mike Podlesny is the author of Vegetable Gardening for the Average Person: A Guide to Vegetable Gardening for the rest of us, the moderator for the largest vegetable gardening page on Facebook and creator of the monthly Seeds Club.

Watch the video below to learn more about Mike`s Seeds of the Month Club:

Monday, April 2, 2012

Home Grown Tomatoes and their Contributions to your Health

Most people still refer to tomatoes as a vegetable even though botanically they are a fruit. Regardless of how you refer to them, one thing tomatoes can be called by everyone is good for your health.

Tomatoes are by far the number one vegetable, er um, fruit, grown in the home vegetable garden. Depending on which survey you have read, tomatoes outnumber its closest competitor by more than 3 to 1, which are cucumbers in one survey I read and peppers in another.

Who can argue adding them to your garden? They are easy to grow from seed, can be started indoors, and there are a wide variety of choices. With plenty of sun, fertile soil and regular waterings, you can have fresh home grown tomatoes all summer long (in most parts of the world).

There are a number of health contributions that adding home grown tomatoes to your diet can attribute to. For example, I recently had a chance to speak with board certified dermatologist and UCLA clinical professor, Dr. Tanya Kormeili.

“I like tomatoes because they are rich in lycopene- which helps reduce the number of free radicals. Free radicals cause aging, wrinkles and contribute to the DNA damage,” says Dr. Kormeili. “Additionally, they contain minerals, water, fiber and are a good source of vitamins A, B, C and E, which are important in skin health and also free radical protection.”

While Dr. Kormeili is a staunch supporter of adding home grown tomatoes to your diet for all the positives, she highly discourages the use of using tomatoes in a form of a topical face mask. She says doing this can cause sensitivity and rash, and that tomatoes should always be consumed and not applied.

So how should homegrown tomatoes be prepared in the kitchen? For this information I turned to Charis Freiman-Mendel, author of the book “Cook Your Way Through the S.A.T.”.

“Many vegetables lose their health potency if cooked, but not tomatoes,” Says Charis. “More carotenoids and flavonoids (also anti-inflammatory and fight allergies) are absorbed from cooked tomatoes than from raw tomatoes because cooking breaks them down and makes them more available to digestion.”

Here are some interesting points that Charis makes:

1. Cook tomatoes in olive oil to improve lycopene absorption. “Think bruschetta”, says Charis and if you need a recipe be sure to check Charis’ website at www.SATgourmet.com

2. Homegrown, especially organic, tomatoes have more nutrients, according to Charis, than conventional sit on the shelf varieties.

3. Tomatoes are low in calories. A perfect addition to any healthy eating plan.

4. Tomatoes are considered acidic which is undesirable, but it’s their acidic quality that helps fight urinary tract infections.

With all that tomatoes have to offer for your health, wouldn’t it make sense to grow at least grow a few plants at home? I believe so.


About the Author
Mike Podlesny is the author of Vegetable Gardening for the Average Person: A Guide to Vegetable Gardening for the rest of us, the moderator for the largest vegetable gardening page on Facebook and creator of the monthly Seeds Club.


Watch the video below to learn more about Mike`s Seeds of the Month Club:


Tuesday, February 7, 2012

Incorporating Manure in your Home Vegetable Garden

I was reading an article the other day in Mother Earth News magazine about a family in California that made a lifestyle change to be more self reliant and work hard towards being more self sustaining. One of the portions of the article talked about the important role their chickens played in tilling the land and adding their own manure to it so that they can grow fresh vegetables, fruits and herbs in fertile soil.

It got me thinking about how every home vegetable gardener can incorporate manure into their own gardens, regardless of how big or small it may be. I am not saying to go out and get a flock of chickens anytime soon, although I know many of you do have them, but more so, what steps can you take to use manure in your own garden, to make sure your soil contains the nutrients it needs to keep producing great tasting vegetables, fruits and herbs.

For help on this topic, I turned to Todd Heft who is the writer of the Big Blog of Gardening. Todd has been gardening for most of his life and focuses in on organic gardening, of which he feels manure must be a part of if you want to add the nutrients to your soil that your plants need to grow.

Todd believes horse manure is the way to go. “First of all, new-to-manure folks should understand that there is no wicked smell from horse manure - not like your dog's waste. Horses eat a variety of vegetables and no meat so there are no offending parasites or bacteria in the waste to create a foul smell,” says Todd.

Todd also says that you should get a manure/straw mixture. This type of mixture is what many owners of horse stables in his area are trying to get rid of. The straw lightens the mixture and that helps break the manure down faster.

Give the manure a couple of months to sit so it will break down before you add it to your home vegetable garden. This also helps in making sure that “rogue pathogens” are killed as the manure pile heats up.

One of the best and maybe not thought about sources of finding good quality manure in your area is Craigslist. Todd hits Craigslist every spring to look for stables that want to give it away. Stables need to unload this “stuff” and they simply can’t throw it in the garbage so many will gladly give it to you if you are willing to go and pick it up. Todd is fortunate in his area that he has had been able to find stables willing to deliver it for a bucks to cover the cost of gas.

I took Todd’s Craigslist challenge myself and did a search in my area for free manure. The list was longer then I had ever thought and I didn’t even realize horse stables existed in some of the towns that came up in the search. Do your own search right now and you will see for yourself.

Now that you know what type of manure you should get and where to get it, it’s time to add it to the garden. So when should you do it? Manure should season first. Fresh manure added to your garden will create an unstable environment for the plants. Seasoned manure which has been broken down is better. What I learned is that if you have fresh manure and do not have the space to have a pile of it sitting around (or maybe the neighbors won’t appreciate it), add your manure in at the end of your growing season after your plants are done producing and then til it in. If you have seasoned manure, adding it in to your soil a week or two prior to planting should be ok.

“I also recommend adding your kitchen scraps to manure to create a fantastic compost,” says Todd. “One should also use an organic fertilizer. Manure can be a little light on the nitrogen side so it's good to add seaweed, bone meal or fish emulsion to insure success.”


About the Author

Mike Podlesny is the author of Vegetable Gardening for the Average Person: A Guide to Vegetable Gardening for the rest of us, the moderator for the largest vegetable gardening page on Facebook and creator of the monthly Seeds Club.

Watch the video below to learn more about Mike`s Seeds of the Month Club: