Here in New Jersey we are
experiencing a boat load of rain. Last I heard on the news, for our
area, we are over a few inches above last year’s total at this same
time. Last year’s total rainfall at this time were normal measurements.
As Luke Bryan sings, Rain is a Good Thing. However, too much rain, is not a good thing for your vegetable plants.
Good drainage in your vegetable garden beds can prevent the most obvious
issue which is root rot. Root rot is a disease that can occur in
vegetable plants both indoors and outdoors, which is the decaying of a
vegetable plants’ roots. Root rot will occur when the roots of your
vegetable plants get too wet, which creates a perfect environment for
various fungi that carry out this process.
As stated earlier, making sure the area where your vegetable plants
reside has adequate drainage is a major key in preventing root rot.
There a few solutions you can implement to prevent excess water around
your vegetable plants’ roots.
For vegetable plants that you are growing indoors, let’s start with the
obvious. Make sure that whatever your vegetable plants are planted in
have enough drainage holes. You may have purchased a pot (or pots) from
a home or garden center and think that it may have enough holes, but
that is not always the case. Do not be afraid to drill a few more in
the bottom of the pot, no less than ¼” in diameter. To prevent soil
erosion in your pots, line them with newspaper before you put your
potting soil in. This will allow the excess water to drain out, while
keeping the soil in.
For your outdoor vegetable garden there are a number of solutions you
can go with. For starters, build your garden beds up using raised beds.
As vegetable gardening author Chris McLaughlin writes in her book Vertical Vegetable Gardening: A Living Free Guide, raised beds give you better drainage especially in areas wher clay soil dominates.
Many people that have raised beds, build them in such a way as there is
no need to actually go into the bed itself and that helps by not
compacting the soil every time a step is taken near their vegetable
plants.
Finally, whether you are using raised beds or not, mix up a soil
solution that aides in wicking away excess water. There are three great
products that you can add to your soil before you plant that will help
with this. They are peat moss, coir and perlite.
The peat moss and coir are interchangeable. Although you can, you would
not use them together as they serve the same purpose. They make your
soil loose and friable. Peat moss is far less expensive than coir, and
one distinct advantage coir has over peat to justify the price, is coir
is more environmentally friendly as a renewable resource since it is
derived from the fiber of the outer husks of coconuts.
Peat moss, also referred to as Sphagnum (peat moss’ genus name), grows
in dense masses on boggy ground. Peat bogs are valuable to wildlife
habitat that rely on them. I was unable to locate any study findings as
to how quickly or slowly peat regenerates itself once it’s stripped.
You would mix either peat or coir with perlite though. Perlite is a
form of obsidian (A hard, dark, glasslike volcanic rock formed by the
rapid solidification of lava without crystallization) consisting of
glassy globules, used in plant growth.
Perlite helps loosen heavy soils (high clay content), aerate soil,
prevent soil compaction, and aid in preventing overwatering. When it
comes to perlite, a little goes a long way. So you do not need to add a
lot to your garden beds.
The combination of using raised beds along with items that aid in
preventing over watering will help with reducing the potential of root
rot on your vegetable plants.
Last
night I was on a radio program and we were discussing fall gardening.
What to plant, what not to plant, when to plant and so on. During the
course of the interview, we began talking about how to protect plants in
the colder months. Without hesitation I replied "use a cold frame".
A cold frame is a great way to extend your gardening season well in to
the cooler months. It works similar to a green house, however it is
lower to the ground, which in turn, at night, will keep the warmer air
closer to the plants. It will also have a means to ventilate easily so
that if it does get warm during the day, you simply open up the
ventilation and let the heat out, which helps prevent "burning" your
plants.
Here is a great step by step instructional that I found on building your
own cold frame out of some recycled material. It's easy to build, and
if you have some basic skills, you should get this done in no time.
Here are the Step by Step instructions

I do very well here in New
Jersey growing peppers. For the past two season, I have had peppers
grow (and thrive) well into November, even after a couple of frosts also
with no cover protection.
I grow a lot of sweet peppers and some hot peppers, but as a total, I
grow a boatload of peppers. Enough to share with the neighborhood my
wife tells everyone.
With that said, I wanted to share some of my tips on peppers, that I
believe has lead me to have such great pepper harvests. Of course I
can’t control the weather in the cooler months that would do peppers
harm, I do believe that by using these tips, I am able to have my
peppers grow very hardy, and that helps out a great deal.
Your Site
As with any other fruit or vegetable plant, peppers are no different,
and that is, good peppers start with an excellent foundation. In this
case, the foundation for your peppers is the soil itself. Obviously
some might disagree and say “no, Mike, it starts with the seeds you
use”. While I do agree with that statement, that good peppers start
with seeds from a reputable company (or a friend), I am assuming that
you have already completed that step.
Before you plant your pepper transplants (or direct pepper seeds), make
sure to mix in plenty of compost. I like to do a mix of compost from my
compost pile, vermicompost from my worm bin, and seasoned livestock
manure (cow manure). I would like to add that I use so much
vermicompost that I added a worm tower this year to my yard and plan on adding another worm tower next season. They can be a bit pricey.
As a side note. If you started your peppers from seeds indoors, be sure
to harden them off, that is acclimate them to the outdoors before you
plant them in your garden bed.
Bring the Heat
Pepper plants love heat. Which bodes well for us here in New Jersey,
because around July to August, between the heat and humidity, it can
become unbearable for humans in the summer. If you live in a cooler
climate, you can always help increase the temperatures around the plant
using cold frames,
greenhouses and so on. You want to keep the temperatures for your
pepper plants above 60 degrees Fahrenheit (roughly 16 degrees Celsius).
Spacing
Peppers are abundant producers when given plenty of space. You may
produce bigger or more quantities of peppers if you grow just a few,
spaced out wider. With that said, I have done well spacing them out
eight to ten inches, although one gardening friend of mine has his
spaced out further (more like 12 to 16 inches), and does great.
Care
Keep your pepper area weed free. I like to use newspaper as a weed
barrier, then place some straw on top of that. I won’t go into all of
the benefits of using straw in the garden, but in this case it further
helps keeping the weeds at bay.
Be sure that your pepper plants receive plenty of water in the early
stages and then a maintenance watering of at least 1 to 2 inches of
water weekly. Water a little more often if your conditions are
extremely dry and/or hot.
The straw we used a couple of paragraphs up also help in retaining moisture in the garden.
To build a healthier, sturdier plant, pinch off the first few flowers in
the early going. You want your pepper plants to direct their energy
towards growing the pepper plant itself, not peppers just yet. This
will pay big dividends later in the season.
Harvest and Enjoy
Once your peppers reach their full maturity, gently pluck them from the
plant making sure you don't damage the plant itself. Some people like
to use scissors to cut the stem, me I will simply pull the pepper with
one hand while holding the branch that it is on with the other hand.
Whatever works for you!
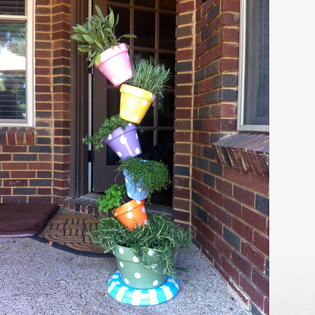
If you have been following our blog, facebook page, or our website, then you already know that we are very enthusiastic about growing vertically.
The sky is truly the limit when it comes to growing vertically with many
varieties of fruits and vegetables, and herbs are no different.
Herbs grow great in containers, and this project combines the best of
both worlds, container gardening and vertical gardening. If you have
some basic tools and handy skills, then all you really need is to get
started.
Here are the Step by Step instructions
You no longer have to search all over eBay
to get great deals on gardening supplies. We did the work for you and
popped them into a single web page on our site. Simply visit eBay Gardening Auctions and take a look today.