Showing posts with label cucumber. Show all posts

Friday, August 10, 2012

Turn Your Home Grown Cucumbers into Pickles

Have you ever grown your own cucumbers?  If so, then your next step of progression is to turn all of those wonderfully juicy cucumbers into great tasting pickles.  If you have never grown cucumbers, then this blog post should get you excited to do so, as you will see just how easy it is to turn those home grown cucumbers into great tasting bread & butter pickles.

I will say this.  I don't care what recipe you follow to make pickles, if you do not start with good fruits or veggies, your end product won't matter.  Canning will not make it taste better, only preserve the great taste it has to begin with.

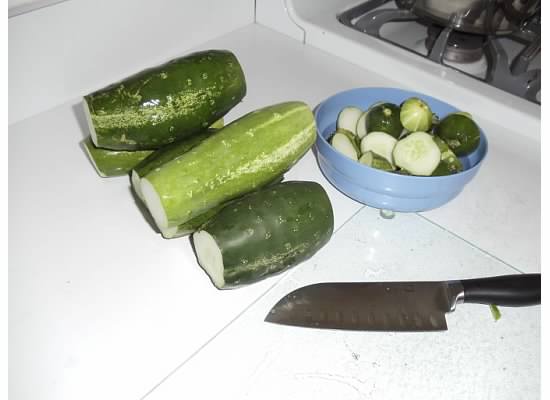
So for this exercise, let's start with some home grown cucumbers.  This year I grew Ashley cucumbers.  They yield plenty to work with and taste great.  Not the most ideal variety for pickling purposes, but adequate none the less.  If you want a great tasting, true pickling cucumber, go with the Boston variety.

Once you have your cucumbers, slice off the ends as it makes it easier to have a flat surface of the cucumber to work with when using a mandolin slicer.  If you don't have a slicer, not to worry, simply use a sharp knife. 

I would have really liked to slice them with a "crinkle cut", but I did not have that attachment, so I settled for plain old flat.

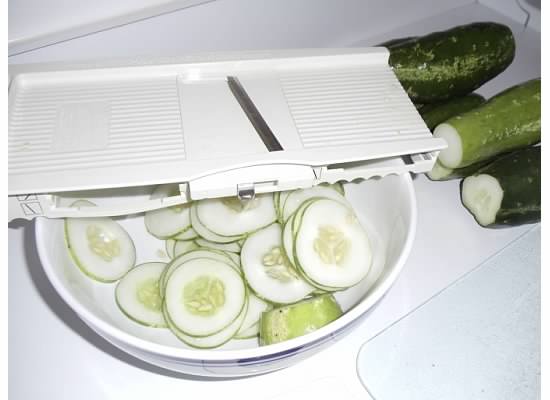
The slicer I use has a nice feature where it "grips" the bowl that the slices go into.  This made it much easier to slice the cucumbers much faster.

I talked to a few people and they have electric slicers which work fast and well.  Probably a good idea to get one in the future if you plan on pickling loads of cucumbers as my friend does.

However, a simple mandolin slicer will do the trick.

I did not use a homemade recipe as I went the very easy route and used a pre-made mix.  For my pickles I chose Mrs. Wages Bread & Butter Pickles mix.  The recipe for this mix is as easy as it gets. 

You mix the dry ingredients in the pack with sugar and vinegar and then heat it up over the stove so everything will blend together.  Very simple!


Now go ahead and fill your jars.  Do not fill all the way to the top as you need to leave some room for head space.  

I filled mine up to just about where the jar starts forming into the mouth.

I also used my canning funnel to make sure none of the residue of the pickles touched the tops of the jar.  While not catastrophic if it does, it makes cleaning easier.
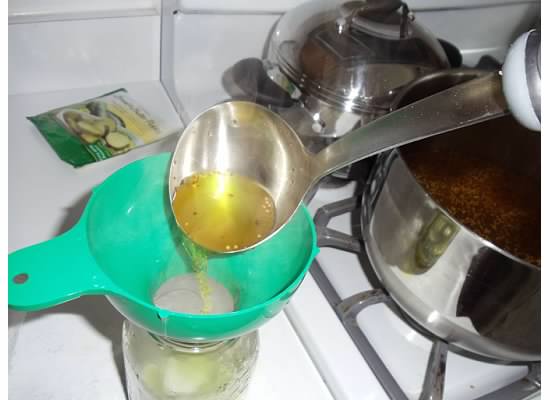
Now that your jars are filled with cucumbers, using a ladle, start pouring the hot pickling mixture into your jars.  Definitely use your funnel for this step.  

Fill the jars with the liquid leaving about a 1/4" of head space.  That is a 1/4" of space from the top of the jar where the lid will sit.

Once the jar is filled, make sure you remove as much air from between the cucumbers as possible by sliding a butter knife (or some other non sharp object) down inside the jar, moving the cucumbers off the side.

You can use the hot water bath method for this process.  I explain the hot water bath method, here, for tomatoes.  The process is the same.

The back of the mix packet will tell you exactly how long to heat this up for, which will be 35 to 45 minutes, depending on where you live as your locations altitude makes a difference.

And that's it!  Great tasting bread & butter pickles, made from cucumbers, right out of your garden.  Once you make these, and see how easy it is to do, you will never want to buy pickles from the store again.

About the Author 
Mike Podlesny is the author of Vegetable Gardening for the Average Person: A Guide to Vegetable Gardening for the rest of us, the moderator for the largest vegetable gardening page on Facebook and creator of the monthly Seeds Club.

Watch the video below to learn more about Mike`s Seeds of the Month Club:

Wednesday, July 18, 2012

Growing Cucumbers in a Small Space

Between last night and this morning I picked roughly 10 pounds of cucumbers.  My kitchen counter was literally covered with them.  My wife made it clear to me that I had planted way too many, and at the rate I am picking them, I really can not argue, but like you, I am addicted to growing fresh veggies.  Besides, my neighbors enjoy them so it keeps me on their good side, espeically since I have a dog that enjoys barking a lot (at night).  You can see the trade off.

But, to me, what makes the production of my cucumbers even more impressive (if I must say so myself), is that it is all done in a four foot by four foot raised bed.  Yes, that is only sixteen square feet of area to grow in.

The raised bed itself is nothing fancy.  It is simply built from landscaping timbers purchased at a local home center not too far from my house.  They were on sale for $0.50 each, so I could not pass it up.  The picture to the left is a photo of my raised bed garden for the carrots I am growing.  The cucumber bed is exactly the same, however, since the vines are very thick and somewhat overgrown, it was tough to get a picture of it, as you will see below.

In the center of the bed I built a trellis, 6 feet tall by the width of the interior of the bed.  As you can see in the photo I used nothing more than some old pine trim wood that I had left over in my garage for both the sides and top.  As you can see from this photo the base of the cucumber plants are full grown so it makes it tough to snap a photo of the raised bed I mentioned earlier.  You will also notice the trellis and how the vining cucumbers grow up it.  Growing vertically is a great method for high production home vegetable gardening with limited space. 
The trellis has attached to it some netting.  I would like to say I found the netting in the trash, or some thrift store, however I did not.  I purchased it from a local garden center for about $5.  Looking back I am sure if I were more patient I could have done better on the price.  With that said, as you will see in the photo to the left, the netting is connected to the wood frame using zip ties.  A friend of mine is an electrician and I "bumbed" a few off of him.  You will also notice that the frame is connected with nothing more than a two deck screws (one on each side), of which I already owned from a previous home project I worked on.


The frame itself is not, however, attached to the raised bed.  I simply drove the sides into the ground with a hammer, before I screwed in the top brace that you see in the photo above.  When the season is over, I will simply pull the trellis out, in tact, and store it away in my shed to be used next season.

Here are some notes about the cucumbers being grown.  They are the Ashley variety, part of the Seeds of the Month Club, and are indeterminants.  I have 16, yes 16, plants growing in that four foot by four foot area.  As of this posting, I have picked a little less than fifty pounds of cucumbers over the past few weeks. 

Looking at the cucumbers vines and how lush and green they are, I think I am on pace to break my own personal record of 200 pounds of cucumbers.  Ashley's are much heavier than the straight eights I have grown in previous seasons, and taste very good, but in my opinion, not as sweet.  My wife disagrees with me.

I would like to say that I am doing something special, unique, or different than some other home vegetable gardener, to yield this many, but I really am not.  My garden is growing in a typical New Jersey suburban neighborhood, and I know if I can grow this many, so can you.

Tuesday, January 24, 2012

Start your Cucumbers from Seeds


Last year was by far the best year for cucumbers that I have ever had. With a good mix of care and of course, excellent weather, the cucumbers I started from seed, blossomed and produced unlike any season before. Here is what I did last year. Hopefully you will have great success as I did.

I love to start all of my vegetable garden plants from seed as opposed to picking up plants at a local garden nursery, garden center or home center. I enjoy the challenge of it as well as knowing that I was involved in the plant’s growing process, literally, from beginning to end. There is a sense of self accomplishment there.

Cucumbers are no different. I like to start my seeds indoors about 3 to 4 weeks from the final frost date in my area. I also like to use a propagation dome indoors for all my seeds to create that greenhouse atmosphere for them. This keeps a constant temperature around my seeds which aids in the germination process.

There are a number of ways and items to use to start your seeds. For me, I like to use left over yogurt, cottage cheese and k-cups as my seed starting pots. For my soil I try to use the soil from garden, since that is where they will end up anyway, however if you are unable to do that, there are plenty of seed starting soils out there which are excellent as well and available at any home or garden center for a few bucks.

When planting your seeds, one half to one inch deep is all you will need to go. Any deeper and they might not be able to produce enough energy to push through the soil.

Under optimal conditions expect your cucumber seeds to germinate in 3 to 4 days, however don’t be discouraged if it takes a bit longer. Also, if you are using the smaller k-cups like I do, or seed starting pods, you will want to transfer them to larger pots once they get about 2 inches tall. For pods, you will start to see their roots grow through the outer netting. Once you do, get them in a pot.

Just like you would with any other vegetable plant, you will want to acclimate them (harden off) to the outdoor environment slowly. Once temperatures begin to warm up, take your plants outdoors during the day and bring them back in when the sun sets.

Once the outdoor temperatures are ready for growing (above 70 degrees Fahrenheit is perfect) transfer them to their final growing spot, where they will receive full sun. As a side note, if you are growing indeterminants such as straight eights, put up a trellis to support the growing vine. You will get straighter cucumbers that way and they are easier to harvest.

Once planted, a moderate watering is all you will need until they begin to flower. Once they flower, start a heavy watering regimen until you begin to harvest, then return back to moderate.

Some final thoughts and observations. The larger you let your cucumbers grow the more seedy they will be. Try to pick them when they are 10 to 12 twelve inches, shorter if you want more of a crispier and crunchier cucumber. Avoid other vegetables in the cucumber family when rotating and try not to plant near potatoes as they make for a bad companion to cucumbers.

About the Author

Mike Podlesny is the author of Vegetable Gardening for the Average Person: A Guide to Vegetable Gardening for the rest of us, the moderator for the largest vegetable gardening page on Facebook and creator of the monthly Seeds Club.

Watch the video below to learn more about Mike`s Seeds of the Month Club:

Thursday, January 5, 2012

3 Vegetable Seeds that have a Large Yield per Seed


If you had room to plant only three vegetables, what would they be and why? I was recently asked this question by a friend. Before I get into what I would grow let me address why I would grow the ones I did choose. If I only had space for three vegetables I would make sure I first grow something that has a high yield and second, make sure I am growing something that I and my family would enjoy eating.

If you have limited space, just like any other product you buy, you want to get the greatest return from what you are growing. For example, if you only had space to plant three items, cauliflower will more than likely not be one of them, unless of course you absolutely love cauliflower. I personally would not choose this item because you are only going to get one plant in one space with one seed. Not a very good return with limited space.

Your best choices are items that will produce a lot on a single plant and preferably can grow up as opposed to out as you will see in my list.

Pole Beans

I love having fresh picked beans with dinner and if you grow pole beans then you already know the amount you will get from a single seed. Pole beans are a great first choice because they fit the bill of both of our ROI (return on investment) requirements. They grow up as opposed to out and their yields are tremendous. Good choices are Blue Lake pole, Kentucky Blue, Kentucky Wonder Brown and Stringless Blue Lake. A single seed can produce hundreds of beans and if you are growing an heirloom variety be sure to save a few to plant again next season.

Cherry Tomatoes

Ok, technically speaking, tomatoes are botanically a fruit, but who can argue the choice of tomatoes. One single seed, according to a recent USDA study can produce over $50 worth of tomatoes. A tremendous return on the investment of time, space, work and cost. To maximize your limited space, choose a variety that produces an even larger amount such as cherry, grape, and yellow or red pear. These tomato varieties keep producing and producing and producing and … you get the point..

Zucchini

If you have grown any type of zucchini before then you already know what the return of just one zucchini seed can give you. My neighbor even told me one time of the old saying “zucchini plants produce so much, so fast, that you can literally watch the zucchini grow before your eyes.” While I won’t say that I have experienced that, I have planted just a couple of seeds and was able to not only keep plenty for my family, but give basket fulls away to neighbors, friends and relatives. Different varieties of zucchini (or other types of squash) will vary on yields. My favorites are the striped zucchini and black beauty.

Your list of vegetables grown from seed in limited space, I am sure, will be different, but these are my favorites. Cucumbers would be 4th on my list, just slightly behind the zucchini. What vegetable seeds would be on your list?

About the Author

Mike Podlesny is the author of Vegetable Gardening for the Average Person: A Guide to Vegetable Gardening for the rest of us, the moderator for the largest vegetable gardening page on Facebook and creator of the Seeds Club.

Watch the video below to learn more about Mike`s Seeds of the Month Club:

Thursday, November 17, 2011

Four Easy Vegetables to Start from Seed


I love to start all of my fruits, vegetables and herbs from seeds, and although I do very well, I can sit here and honestly say that all of my efforts are not successful. In fact, this past season my cantaloupe did not fair as well as I had hoped, but my eggplant on the other hand were the best crop I have had in my life. That’s just the nature of vegetable gardening. Just when you think you have one crop mastered, you have a bad season with it. Maybe that is par for the course.

Regardless of the ups and downs of different crops I seem to do extremely well with the same crops every year when I start them from seeds.

Radishes
One of the fastest growing vegetables that I start from seeds, radishes will yield two crops in the late-winter to early spring and again late-summer to early winter. Many varieties produce in as little as 45 days, and make a great addition to a salad. I do not start radishes indoors as I don’t see the need since they produce so quickly.

Tomatoes
What would a list be without tomatoes on it, especially when I am from the garden state and all the bragging we do here about Jersey tomatoes. I will say that some years I do great and less often I do just ok, but I have never had a season where I did not get an ample crop of tomatoes. I always start my seeds indoors around the beginning of March, then will move them to the outdoor greenhouse in bigger pots until the weather warms up enough at night so that I eventually put them in their final spot in the garden. Top advice? Pick a spot in your yard that receives direct sunlight from morning until night time for best results. That’s what works well for me.

Zucchini
A neighbor once told me, zucchini grows so fast that you literally watch it grow before your eyes. I can not disagree. I have had plants where on one day a new zucchini growth is about an inch long and the next day (ok maybe two) it was ready to be picked. I will start zucchini indoors just like tomatoes. Unless you either have a large family, plan on feeding the neighborhood or donating a lot to local food pantries, just a couple of zucchini plants will suffice. They produce so much so quickly that many, especially new gardeners, put in about 6 plants and then harvesting zucchini becomes a full time job. I always grow 3, which for me, seems to be plenty.

Cucumbers
Last season I had the best cucumber crop in my life. I was literally giving away about a dozen to two dozen per week. I had 9 plants going which is more than what I normally do, but in previous years my surplus was around a few every week. Just like my tomatoes and zucchini I start cucumbers indoors. For me personally I always grow vining types such as the straight eight. For best results use a trellis. I built my own out of some left over wood pieces and some netting. It took about 20 minutes to throw it together. This gives the cucumbers a chance to climb and spread out. I start my cucumber seeds indoors, and like tomatoes, won’t move them outdoors until the temperatures at night have warmed up enough.

Every gardener has their favorites, these happen to be the ones I have had the easiest time with and the most success. I’ll cover herbs in a future article. They are very fun and easy to grow as well.

About the Author
Mike Podlesny is the author of Vegetable Gardening for the Average Person: A Guide to Vegetable Gardening for the rest of us, the moderator for the largest vegetable gardening page on Facebook and creator of the Seeds Club.

Watch the video below to learn more about Mike`s Seeds of the Month Club:

Friday, November 19, 2010

NOW THROUGH CHRISTMAS, $0.49 ON SELECT SEEDS!!!

Christmas SpecialFrom now through Christmas we have placed select seeds on sale for $0.49 per pack!


There is no limit on the number of packs you can buy and all orders over $10 receive free shipping. This special is for a limited time and when December 26th arrives....this special will be over. So get your seeds today!

Shop in our online Store today!

Thursday, August 26, 2010

Vegetable Gardening in every Yard

Our goal here at Mike the Gardener Enterprises is to get vegetable gardening in every yard everywhere we can think of!

In order to do that, we need to make it easy and affordable to get started and then ensure support for those that need to help to succeed.

You can support our "Vegetable Gardening in Every Yard" campaign at http://www.indiegogo.com/mike_the_gardener

Every bit helps!

Monday, July 26, 2010

Tractor Tires for Raised Bed Vegetable Gardens

It isn’t as if most people have old tractor tires just lying around collecting dust. Nevertheless, a good old tire that’s no good for driving on anymore doesn’t have to go to the trash pile. And when it comes to raised beds, there’s hardly a thing better than a burly tractor tire. By making a few minor alterations, removing the upper rim and painting the outside, that old hunk of rubber can have a second life—maybe even one that is nobler than the first.

To the gardener, it would be an insult to explain the benefits of raised beds. Just the same, they would be remiss to overlook the cost of materials to build raised beds. Purchasing good wood for frames is expensive, but it can’t be cut out, that will only lead to board rot and an open invitation to soil pests. Intro the tractor tire. He had a hard life on the wheels of his green driving machine and is excited to a retirement of laying about doing a whole lot of nothing.

Instead of making a costly purchase like railroad ties or treated wood, anyone who is interested can meander down to a local auto shop, poke their nose in and inquire about used tires that are destined for the dump. Most mechanics are happy to unload useless tires since it saves them a trip to the dump and any of the associated paperwork that accompanies rubber waste. What that means for the gardener is that he or she can acquire a perfectly good raised bed for free.

Then, once the tire has been introduced to its new home, it is just moments away from becoming a part of the thriving garden. The trickiest part of the tire to raised bed metamorphosis is cutting away that husky upper lip. Often the rubber will be about three-quarters of an inch thick along the outer rim. That’s a job no scissors could address, but a handsaw would gladly step in. After the rim is cut, the tire is nearly ready.

Because the color black is such a great heat conductor, the tire will need to be painted a lighter shade: white or yellow will reduce the amount of heat absorption keeping plant roots from burning and water from increased evaporation. After a coat of spray paint the tire will be ready to fill and plant.

While one tire won’t be able to accommodate a large crop, it will open up a few advantages that traditional raised beds are not good for. One tire could be unobtrusively placed at each directional plane of any house, meaning that varying degrees of light would shine on each one throughout the day. Since plants have so many different needs for direct sunlight, this is a great way to open up more possibilities for the plants that can be grown. By freeing the tractor tire from the doom of a landfill, any garden can thrive and become more versatile.

About the Author
Jody Sperling is a contributing writer for Mike the Gardener Enterprises, LLC the exclusive home for the Seeds of the Month Club.

Wednesday, August 26, 2009

How to Grow Cucumbers in your Vegetbale Garden

Cucumbers are a great vegetable to grow in any garden. They are excellent for salads, or to simply dip in some ranch dressing (or your favorite flavor).

There are a variety of great dishes you can make with cucumbers and if you have time to learn it, the skill of "pickling" can take your cucumber even further.

More importantly though, is, all of that is for naught if your vegetable garden does not produce plenty of healthy cucumbers.

Here are some steps you can take to increase your chances of healthy and more abundant harvest in your home vegetable garden.


Thursday, July 30, 2009

How to Pick Cucumbers the Right Way

Cucumbers are a great vegetable to grow. They are easy to maintain and yield a high amount of fruit.When they get to the correct size most people will just pick the cucumber by yanking on it and ripping it off the vine.If you use that technique you could be doing more damage to your cucumber plant then you know.Here is how you can properly pick a cucumber.


http://www.ehow.com/how_5238959_pick-cucumbers-right-way.html

Wednesday, June 10, 2009

Vegetable Gardening: The Rabbits Ate My Tomatoes, Now What?

Seven years ago I moved into my new home in the suburbs. I lived in a city where the sight of a rabbit was as a rare as Halley’s Comet. In fact in the city in which I lived, pigeons were more of a problem than any other type of animal you could think of.

So I started my garden in my new home. A row of beefsteak tomatoes, a row of grape tomatoes, peppers and so on made up my plot of land that I designated to grow my produce. With no experience in protecting my garden from rabbits, once my plants were in the ground I figured I was done so I simply walked away.

The next morning I arose to see that both rows of tomatoes (beefsteak and grape) were absolutely decimated. Chewed down to the stem with about an inch of height from the topsoil, the rabbits left near nothing.

After doing some research, instead of buying new plants I learned that the tomatoes will return and that they grow like a weed, meaning, that even though they were chewed down to the stem, tomato plants will still grow even though their solar collectors (their leaves) no longer existed.

But I also knew that if I did not take any preventative measures the rabbits would be back to finish the job. So here is what I did. First, I outlined my garden with landscaping bricks and set them two bricks high. That alone will not keep the rabbits out so I also added a fence. I use poultry fence which is available at any home center. Sixteen inches of height is all you will need for rabbits (at least in my area).

I attached the fencing to some pieces of cedar wood that acted as fence posts, which holds the poultry fence in place. If you are unfamiliar with poultry fence, it is very wobbly, “bendy” you could say, so you will need to attach it to something in order to stabilize it. I used J-T50 staples to attach it to my posts. They are also available at any home center.

The bottom of the fence sits about an inch to two inches lower than the top layer of brick. I am not sure if rabbits can squeeze in, but I did not want to take any chances.

The bricks were the most expensive at about two dollars per brick, and the fence was thirteen dollars for a fifty foot roll. I found the wood on Craigslist for free, so other than the cost of gas to drive a couple of miles to go get it, that part was free, and I already had the staples from a pervious project. So the cost to secure my garden from rabbits was nominal at best.

If you are having issues with rabbits give these solutions a try. It is a cost effective solution without having to spray any chemicals that are developed to “deter” rabbits. Also make sure you buy poultry fencing and not the “so called” rabbit fence. The rabbits can and have gotten through the “rabbit proof” fence in my area in the gardens that belonged to some of my neighbors.

About the Author
Michael is the author of the book Vegetable Gardening for the Average Person, a practical easy to follow guide for the home vegetable gardener. You can follow him on Twitter as well as join his Facebook Fan Page.

Thursday, May 28, 2009

Weight Loss: Grow Your Own Health and Nutrition in Your Backyard

We all at some point would like to drop a few of those extra pounds we put on, whether it was from mom’s thanksgiving dinner, or an extra piece of that birthday cake, over time they all add up around the waist line.

Lucky for all of us we have the power to do something about it. No it doesn’t mean that you will spend countless hours in the gym training as if you were getting ready for the Olympics, it means we can implement a healthy eating plan today and start losing weight right away. The best part is you can grow some of these foods right in your backyard which saves you some money too!

If you want to lose weight, you need to eat right, drink plenty of water and do some physical activity. In this article I am going to focus in on the eating right portion.

For optimal weight loss you need to eat small well balanced meals throughout the day. In other words you should consume one meal every two and a half to three hours everyday. Each meal should consist of equal portions of proteins, carbohydrates and green vegetables grown from your own garden.

You might be wondering just how much a portion size is because even too much of any of those can be more than enough right? Well, yes and no. You should limit yourself to a portion size, more on that in a moment, for your proteins and carbohydrates, however for your green vegetables you can consume as much as you want.

Instead of using a scale or counting calories a good way to remember a portion size is to make a fist. Your clenched fist should be the size of a portion that you are going to consume. This is also the same amount of green vegetables that you should at least eat, although as mentioned earlier you can eat more of them.

The reason why you can eat more green vegetables than proteins or carbohydrates is that they are very low in calories and high in minerals in nutrients your body needs, as well as they can fill you up. So if you ever find yourself hungry, reach for a nice big tossed salad of greens.

I mentioned earlier how you can grow your own nutrition. What I mean is all of the green vegetables that you can consume, broccoli, asparagus, spinach, lettuce and others, can all be grown right in your backyard. By growing your own vegetables, not only will you be growing the food that will help you lose weight, but the amount of money you will save by eliminated that cost from your weekly shopping trip will add up quickly.

To maximize your weight loss, remember to eat frequently throughout the day, six smaller equally portioned meals. Eat one meal every two and half to three hours each day. Make sure each meal has one portion of healthy proteins (chicken breast, lean meat, fish, egg substitutes), one portion of healthy carbohydrates (multi grain breads and cereals, brown rice, potatoes), and at least one portion of green vegetables grown from the garden in your backyard. Follow these simple tips and you can lose 5 to 10 pounds in no time.

Just remember to obtain a complete physical from your primary care physician prior to starting any type of physical fitness program or nutrition eating plan.

About the Author
Mike is the author of the book Vegetable Gardening for the Average Person. It is a practical easy to follow book that teaches gardeners everything from composting techniques, aeration and frost conditions, to choosing the right tools and picking the right seeds.

Monday, May 25, 2009

Composting: Helpful Tips to Creating Nutrient Rich Compost


Composting is the process of organic material breaking down. The process of breaking down is more commonly known as decomposing. There is an entire ecosystem of earthly creatures, some you can see like worms, and many you can not like bacteria, that are working hard for you to give you great compost.

With that said there are still some things you can do to either speed up the process or make it more efficient. I have listed some of my tips below that have helped me with my gardening adventures and I am sure they will help you as well.

Ventilation & Aeration
Oxygen is required by all living organisms. For humans we need it to breathe and stay alive. The ecosystem in your compost pile is the same way. They need oxygen to live, throve and prosper. So when you build your compost bin, whether it is a wooden box or a store bought one, make sure there is plenty of ventilation holes in it so oxygen can get in.

Temperature
There is an optimal temperature range for compost to decompose efficiently. Starting at 90 degrees Fahrenheit up through 135 degrees Fahrenheit has been shown to be the best. Although some experts will say it can go as high as 155 degrees Fahrenheit, if you keep it within the range above you should be ok. Invest in a compost thermometer to monitor the temperature of the middle of the compost pile. When that temperature starts getting near the top range it is time to work the pile by turning it over. This keeps the center a nice level for your decomposing ecosystem to work.

Water
Your compost pile must remain moist. Let’s face it, worms, bugs, bacteria and fungi all like it a little more wet than you and if you want to excel at decomposing your organic material then misting down your pile is a great way to go. You do not need to drench it, but only apply enough water to where the pile remains moist and damp.

Reduce
Would you pick up a entire steak and put it in your mouth? Or an entire zucchini for your vegetarians out there? Of course you wouldn’t, or at least I hope not. Well your earth workers do not want to shove an entire egg shell in their mouth either. What I am getting at is if you want the optimal performance of decomposition shred or grind your material before you put it in the bin. It makes it easier for your workers and will speed up the process.

Mixture
Get a good mixture of various organic material together. You could make compost out of just grass or just leaves, but by combining them you are creating a compost that covers all of the nutrients needed by plants in your gardens. Your compost bin should consist of leaves, grass, twigs, pine cones, newspaper, paper junk mail, and old cotton clothing (all metal and plastic removed of course).

As you can see they are straight forward tips and advice that you can start implementing today for better compost.

About the Author
Mike is the author of the book Vegetable Gardening for the Average Person. It is a practical easy to follow book that teaches gardeners everything from composting techniques, aeration and frost conditions, to choosing the right tools and picking the right seeds.

Friday, May 22, 2009

Compost Tea: The Natural Elixir of Gardening that Mother Nature has Perfected


One of the best natural solutions to make your plants healthier is through the use of compos tea. Compost tea is the process by which you use compost to brew a liquid solution that you will then “feed” to your plants. Compost tea can be applied to vegetables, trees, bushes, flowers, or in short anything that you grow that you want to get healthier.

The first step is to get compost. You can buy compost from a local nursery or garden center but the better option is to make your own. You make compost from organic material. In other words grass, leaves twigs, and food waste to name a few.

You then take the compost and mix it with water. After about an hour of soaking you can use the compost enriched water on your plants and you will get excellent benefits, but if you really want to get the most out of your compost tea, you have to brew it.

To brew compost tea you simply add an air pump to pump in fresh oxygen into the water as well as one to two ounces of molasses. What you are doing is creating an environment where bacteria that live in the compost will thrive.

After brewing for a couple of days separate the compost from the liquid with a strainer such as cheese cloth or an old screen and you are all. Put the liquid in a watering can or sprayer and let your plants have it. It is the most natural type of fertilizer you can ever apply to your plants that no chemical can reproduce.

Compost tea introduces healthy minerals and nutrients into the soil as well as “good” bacteria that work hard in the underlying ecosystem to create an environment for the roots of your plants to thrive.

Compost tea has also shown to prevent many diseases found in plants due to the microbial population found in compost tea.

You should apply compost tea first thing in the morning and if you are putting it directly into the soil it is ok to apply during rainy conditions, however if you are applying it directly to leaves then you should wait for a dryer day.

Studies have shown it is best to use your compost tea within 4 to 6 hours after you brew it. Remember you have living organisms in that tea and having it sit around too long can kill them and render your tea useless. Besides you have been waiting 2 days to use it while it’s been brewing.

As you can see compost tea has many benefits. Whether you are an avid vegetable, flower or shrub gardener, or are new to gardening altogether, then you should get to know how to brew compost tea, and start applying it to your gardens immediately.


About the Author
Mike is the author of the book Vegetable Gardening for the Average Person. It is a practical easy to follow book that teaches gardeners everything from composting techniques, aeration and frost conditions, to choosing the right tools and picking the right seeds.

Wednesday, May 20, 2009

Three Reasons why You should be Adding Vermicompost to Your Soil


Vermicompost, also known as worm castings, is the end result of worms feeding off of organic material such as food waste. Vermicompost has shown in studies that it contains much needed water soluble nutrients your vegetables, fruits and flowers crave.


You can either make your own vermicompost by adding worms and food scraps to a ventilated container or buy vermicompost commercially. Either way is fine and if just adding nutrients to your soil is not enough proof to use vermicompost than read these three other ways to justify its purpose.


Soil


I have mentioned this already and that is vermicompost adds much needed nutrients back to the soil. Each growing season your plants will use certain nutrients in order to flourish. If you do not replenish those nutrients, your plants will eventually stop growing or die. Also, vermicompost enriches your soil with various micro-organisms by adding enzymes such as phosphate and cellulase. Vermicompost also more deep burrowing earth worms already in the soil and will actually increase your soil’s water holding capacity.


Plants


Your plants love vermicompost obviously for the nutrients it provides but also for the fact that vermicompost has been shown to enhance germination and increase crop yields. Recent studies have even shown an improvement in root growth and structure of various plants.


Economic


Since you are using your food waste to create vermicompost, it goes without saying that you when you do this you are adding less garbage to local landfills. And because you are not simply throwing the food away, it reduces the amount of biowaste which in turn reduces potential contamination in our streams and waterways. Also in some parts of the country, in large scale production centers for vermicompost, jobs have been created. Somebody has to do the work right? Vermicomposting is a low cost way to create natural fertilizer, thereby making it possible to add much needed nutrients to the soils of a lot of less developed agricultural regions.


Large scale productions of vermicompost have been shown in some studies to have a higher yield of valuable soil microbial probably because of the feedstock waste available. This does not mean that your homemade vermicompost is not adequate enough for your gardens though.


You should definitely start implementing a process in creating your own vermicompost so that you can add it to your soil so your plants can start enjoying all the benefits mentioned above and more. If you want to learn more about the vermicomposting process there are a number of good books on the market and you can visit the Cooperative Extension Service website which is a division of the United States Department of Agriculture. The COE is an informal educational program that exists only within the United States that was designed for the sole purpose of helping people with research based knowledge.


Vermicomposting is a must for any gardener that wants to improve their plants and the soil that their plants grow in. If you are a gardener or an aspiring one, and you are not creating your own vermicompost, then you should be. Start your vermicompost bin today.
document.write(getResources());

About the Author


Bruce is the co-author of the book Vegetable Gardening for the Average Person. It is a practical easy to follow book that teaches gardeners everything from composting techniques, aeration and frost conditions, to choosing the right tools and picking the right seeds. To learn more about Mr. Tucker you can visit: AveragePersonGardening.com.

Tuesday, May 19, 2009

Adding Vermicompost to Your Soil will Increase Vegetable Gardening Success


Vermicompost is the end result of organic material such as food waste after it has been digested by some species of earth worm. Commonly referred to as worm castings, vermicompost contains water soluble nutrients and bacteria that make a great organic fertilizer for your garden.

The process in which you feed a worm organic material and turn it into vermicompost has an actual name called vermicomposting.

Although every worm produces worm castings, the worm best for the job to produce quality vermicompost for your garden’s soil is called Eisenia foetida or the red wiggler earthworm. Most of North America will use this species of worm, but if you live in a tropical part of the world, look towards Perionyx excavatus (Blue worms) and if you have a more acidic soil then use Eisenia hortensis (night crawlers).

Vermicompost can be used to brew compost tea, a rich elixir that is sprayed on the plant’s leaves and stem as well as added to the soil so the roots of your vegetables can absorb the tea’s nutrients, and vermicompost can be mixed directly in with your soil.

You can buy vermicompost at many nurseries or garden centers, but you can actually make your own with a box, some worms, and a little water and some time.

The easiest way to make your own is to buy a large plastic or rubber container (similar to one you would store household items in), drill holes in the lid, and the sides for air ventilation, and drill holes in the bottom for water drainage. Then put down two inches of shredded newspaper, followed by shredded leaves, grass clippings (in limited quantities) and your food left scraps followed by another two inches of shredded newspaper.

To get some worms just look on your sidewalks or in the street after a heavy rainfall. They will be crawling everywhere. Their homes get flooded and they go to higher ground where it is wet but more tolerable.

You simply put the worms on top of your shredded newspaper and put the lid on. The worms will work their way down through the newspaper and find the food waste. It is very important that you keep the contents of your bin moist. Worms need a moist environment in order to thrive. A simple misting of the contents of the bin on a daily basis should suffice. As a side note, place something underneath the bin to catch any water drainage. Any moisture you capture you should then be dumped back into the bin.

You will know when it is time to retrieve and harvest your vermicompost by simply seeing that very little or no food scraps remain. There are a couple of ways to harvest the vermicompost. The first way is to dump the entire contents out, and remove the worms by hand. The second way is to divide your rubber container in half initially by only placing food scraps on one side of the container. Then when it is time to harvest the vermicompost you add food scraps to the other side. When you do this the worms will move to the side where there is food leaving you with a near wormless side of quality vermicompost.

Vermicompost is a great way to add much needed nutrients to your garden’s soil and the best part is you can do make it right in your own backyard all year round.

About the Author


Bruce is the co-author of the book "Vegetable Gardening for the Average Person: A guide to vegetable gardening for the rest of us". It is a practical easy to follow book that teaches gardeners everything from composting techniques, aeration and frost conditions, to choosing the right tools and picking the right seeds. To learn more about Mr. Tucker or to inquire about the book you can visit: http://www.averagepersongardening.com/.


Check Out These Five Garden Vacation Getaways

Gardening doesn’t simply have to be just your flower bed or vegetables growing in your yard anymore. Now it can be a full fledged vacation. Here are some destinations that you can travel to if you want to get away and still enjoy your love for gardening.

The Butchart Gardens
Nestled on 55 acres on Vancouver Island, it ranks as one of the world’s greatest garden spectacles. Started in 1904 by Jennie Butchart, she began sculpting the landscape to meet a Victorian style. The Butchart Gardens boasts 26 greenhouses, and a variety of flowers that bloom throughout the year. You can go on self guided and group tours as well as eco-friendly boat tours. They boast a gift shop where you can buy seeds of the flowers they grow as well as a knowledgeable staff to help you in your own gardening ventures. If you love gardens, this is a great one to see.

National Gardens in Washington, DC
Beyond the many historical and governmental attractions of the nation’s capitol sits the newest addition to the botanical gardens which opened in October of 2006. The National Gardens has four gardens, which consist of a seven bed regional garden, a first ladies garden, a formal rose garden and a butterfly garden. The gardens have a great backdrop of the US Capitol and best of all there is no cost to go in to see them.

Kirstenbosch National Botanical Garden
When you think of Africa most people right away think of safaris as a vacation getaway, but located in Cape Town South Africa are the Kirstenbosch National Botanical Gardens. These gardens only grow indigenous South African plants. Located on 528 hectares, the gardens also boast a natural forest. Founded in 1913, it boasts a well staffed visitor center, and educational facilities to learn about all of the plants being grown there.

Sissinghurst Castle Garden
The Sissinghurst Castle Garden was created in the 1930s by Vita Sackville-West (poet and gardening writer) and her husband Harold Nicolson. It is one of the most well known and renowned gardens in the entire United Kingdom and draws visitors from all over the world. The garden is designed to look like a series of rooms of which each room has its own unique design and theme. First opened to the public in 1938, Sissinghurst boasts Garden suppers, lecture luncheons, estate walks, local food events, a literary festival and monthly farmers’ market. It also has a fully operational vegetable garden that supplies fresh fruits and vegetables to the restaurant on the premises.

Amy B.H. Greenwell Ethnobotanical Garden
As if you needed another reason to go to Hawaii right? Located on the Kona side of the island 22 miles south of Keahole Airport, this 15 acre botanical garden focuses on the study of Hawaiian people and the plants they grow. The garden boasts over 200 species of plants, self guided and group guided tours that can last for up to an hour. Also, if you hit the gardens at the right time of the year, you will get to experience their native insect house that features the Kamehameha butterfly one of only two butterfly species native to the island.

After visiting these five garden destinations your eyes will be opened up to a whole new world of gardening that you never thought or knew existed.

About the Author
Bruce is the co-author of the book "Vegetable Gardening for the Average Person: A guide to vegetable gardening for the rest of us". It is a practical easy to follow book that teaches gardeners everything from composting techniques, aeration and frost conditions, to choosing the right tools and picking the right seeds. To learn more about Mr. Tucker or to inquire about the book you can visit: http://www.averagepersongardening.com/.