Showing posts with label water. Show all posts

Friday, April 26, 2013

How to Water Your Tomatoes at the Roots

We have been posting a number of features on tomatoes lately. And why not! Tomatoes are the king of the garden. More people grow tomatoes in home vegetable gardens then any other fruit or vegetable.

Check out this tutorial of getting more water to your tomato roots for better growth that we found on "A Sonoma Garden".

This is as about as simple as it is going to get when it comes to watering the roots of your tomatoes. With some simple supplies and a few minutes of your time, you can create this set up in no time.

Here are the Step by Step instructions

Monday, August 13, 2012

Getting Started, Canning your own Home Grown Vegetables and Fruits

Many vegetable gardeners out there such as yourself grow more fruits and vegetables then you can consume before they start to decay or rot. While giving away a portion of what you grow, whether it’s to a friendly neighbor or simply a donation to a local soup kitchen or food pantry, is a good thing, you can also preserve much of your harvest for the months in which you are not able to grow in abundance or at all.

While many methods for preservation exist, there are two common ones that have been around for quite some time and are becoming more popular every day. You can tell when something is becoming popular when more and more stores carry a line of products to handle the tasks of that “something”.

In this case that “something” is food preservation and the two popular methods for handling such a task are boiling water canning and pressure canning. Each serves a specific purpose, which i will get to in a moment, and both are valuable as well as easy to do. They each require some basic equipment, and a little know how.
 
Be sure to join Mike`s vegetable seeds mailing list

Boiling-Water Canning
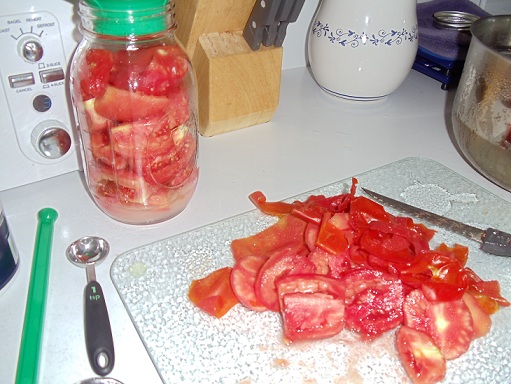
The method of boiling water canning is used when foods are high in acid, such as lemons, peaches, tomatoes, plums and so on. These, and many other items like them, have a pH level at or below 4.6, meaning they have a high acidic content.

This method is conducted by bringing a pot of water to boil at 212 degrees Fahrenheit and submerging jars filled with whatever you are preserving into the boiling water and letting them sit there for a period of time.

High acid foods are processed using this method. Sometimes, recipes call for adding lemon juice so as to increase the acidity of the mixture. The combination of the high acid and the temperature at which the jars are boiled at result in destroying molds, yeasts, various forms of bacteria and inactivate some enzymes.

I will talk about pressure canning in a moment, however, never use the boiling water method to preserve foods that are not high in acid such as beans, peas or corn. For those items you need a temperature of 240 degrees Fahrenheit to destroy bacterial spores that exist in low acid foods, and that can only be obtained with pressure canning.

Pressure Canning
That brings me to the second method of canning, pressure canning. The only way you are going to get the water in your pot up to 240 degrees Fahrenheit is through pressure canning. This temperature is important because it destroys all bacteria, spores and toxins that low acid foods produce.

Besides the popular varieties of veggies mentioned earlier that fall into the category needed to be pressure canned, okra, carrots, beets and turnips are a few more. These veggies are above the 4.6 pH level.

There is a special piece of equipment used for this method called a pressure canner. No surprise there right? The basic items of this canner are the base, a lid, the gauge (dial or weighted) and a rack. The total cost for this canning package, which is sold as a complete set (although you can buy replacement pieces), runs anywhere from $60 to $100.

The way it works is to submerge your jars of low acidic foods into the base and place them on the rack inside, place the lid on your canner and use the gauge to monitor the pressure and temperature. The gauge will release small amounts of steam to maintain the proper pressure inside the container.

Be sure to follow the maintenance instructions that come with your pressure canner. The gauge which measures the pressure in your canner, should be tested for accuracy (dial gauge only) usually once per year and replaced if the reading is off by 5psi (pounds per square inch) or more. A weighted gauge does not need to be tested for accuracy but must be replaced if there is any damage to it.

Some helpful utensils such as a jar lifter, jar funnel, bubble remover, headspace tool and lid wand, make canning that much easier as each of these utensils can be used in both methods.

I would recommend starting off with something easy. I canned peaches as my first run through the canning process. It was easy because I was able to use the boiling water method, and I had the proper items needed already in my home. Then I moved to tomatoes and pickles still using the boiling water method.

Like anything else it takes practice. Don’t be afraid to make a few mistakes, or in my case, messes, along the way, and you will be fine.

About the Author
Mike Podlesny is the author of Vegetable Gardening for the Average Person: A Guide to Vegetable Gardening for the rest of us, the moderator for the largest vegetable gardening page on Facebook and creator of the monthly Seeds Club.

Watch the video below to learn more about Mike`s Seeds of the Month Club:

Friday, August 3, 2012

How to Can your Home Grown Tomatoes

Growing your own food is a thrill.  You will feel a tremendous sense of accomplishment.  Whether you start from seed or get some plants from a local nursery, when you take a bite out of that first home grown tomato, you will never want to eat a store bought one again.

But what happens when gardening season ends?  This is where storage comes into play.  I recently wrote a few articles on basic storing methods, but in this article I want to give you specific steps to "can" those home grown tomatoes using the water bath method.


The canning items you will need are the following:
  • Some canning jars.  These are available for about $9 to $14 per dozen, depending on the size.  They come in pints and quarts as well as wide mouth and narrow mouth.  For this article, I am using quart sized jars with narrow mouths.
  • Jar bands and lids.  These usually come with the jars, however the lids are not reusable.  I'll get to more on that in a moment.
  • Some utensils.  These will include a lid grabber, which is nothing more than a stick with a magnet on it, a jar grabber, and a funnel.
  • You will need a large pot that is deep enough to put the jars in and have at least one inch of water on the top.  Many places sell a pot/utensil combination kit for $30 to $50.
Items that you will need that you may have around your house already, but will need:


  • Lemon Juice
  • Salt (optional)
  • Tablespoon
  • Teaspoon
  • 2 pots, 1 for hotwater, 1 for ice water
  • Tongs to grab the tomatoes
  • A ladle for the hot water you will add to the jar


For this article I chose roma tomatoes that I grew in my garden.  The steps are the same for any tomato, but the romas are perfect for marinara sauce.  I like my beefsteak tomatoes for salsa.  I'll save that for a seperate article.

Be sure to join Mike`s vegetable seeds mailing list


STEP 1 - Peel the Tomatoes
While you don't absolutely have to remove the skins, your tomatoes will taste much better later on when you go to use them.


The simple way to remove the skins is through the blanching process.  Bring a pot of water to a boil.  Once the water is boiling, drop your tomatoes into the pot for 45 seconds.  You will see the skins on the tomatoes start to crack and seperate.
After 45 seconds, start removing the tomatoes with your tongs and immediately plunge them into another pot filled with ice water.


Now you are ready to start peeling the tomatoes.  There is no real science to this.  Just use your fingers and hands, and start peeling away.  I like to keep a bowl nearby to throw the peels into.  I will then throw those peels into my compost bin.  Nothing goes to waste!  Or at least I try to make sure nothing goes to waste.


STEP 2 - Add Some Ingredients

To your empty jar, add two tablespoons of lemon juice and 1 teaspoon of salt.  The salt is optional.  Meanwhile, before you get to the next step, get a pot of water going on the stove.  You will add the hot water to your jar in a later step, but you need this for the liquid to add to your lemon juice.  Some recipes I have read said make sure it is boiling, while others said it only needs to be hot.  I just heated mine up.  Never brought it to a boil and it works fine for me.

STEP 3 - Put the Tomatoes in your Jar
How you can your tomatoes is up to you.  Some people like to can them whole, while me personally I cut them in half.  The choice is yours and the process is still the same.


Using your funnel (which helps keep tomato residue off the lids and sides of the jar), start putting your tomatoes in your jar until the jar is filled.  Make sure you take up as much space as possible.  DO NOT FILL ALL THE WAY TO THE TOP.  Leave about 1/4" of head space (space between the top of the tomatoes and the top of the jar.
STEP 5 - Add hot water
Take a large spoon or ladle and start taking water from your pot of hot water (from step 2), and slowly add it to your jar of tomatoes.  In between each ladle of water, use a butter knife or a spoon and gently slide it down the inside sides of the jar to help release any air trapped between the tomatoes.  Fill the jar with hot water leaving a 1/4" of head space.

STEP 6 - Add your jar to the water bath

Place your jar of tomatoes in your large pot of hot water.  As you can see in the picture, the pot that I am using comes with a basket with handles which makes it easier to put many jars on and then lower the basket into the hot water.  It also allows for space underneath the jars inside the pot as well.


STEP 6 - Remove the Jars


Pints will need to be in the hot water for 35 minutes, quarts for 45 minutes.  If you live in areas of higher elevation you should add another 10 to 15 minutes.Once the the time has elapsed, use your handy jar grabbing tongs, and remove the jars from the hot water bath and place them on a cooling rack. 

Leave the jars there to cool for 12 to 24 hours.  You will hear a "pop" sound when it completely seals.  This usually occurs within the first few hours.  If after 12 hours you did not hear the pop, or you can easily push the center of the lid of the jar in and out, then it means the jar did not seal properly.

I have read you have up to 24 hours to attempt to reseal, however at that point I simply just consume the contents of the jar within 3 days since I try and do all of my canning in a single day.  I'd hate to start all over again for a single jar.  The choice is yours.

And that's it!  Store away in a cooland dry location out of the way of any sunlight.  Basements work best for this.


About the Author Mike Podlesny is the author of Vegetable Gardening for the Average Person: A Guide to Vegetable Gardening for the rest of us, the moderator for the largest vegetable gardening page on Facebook and creator of the monthly Seeds Club.

Watch the video below to learn more about Mike`s Seeds of the Month Club:

Thursday, January 19, 2012

3 Tips for Growing Great Tomatoes from Seeds


There is nothing more popular to grow in the home vegetable gardening world then tomatoes. By more than 3 to 1 it outshines it’s next counterpart (peppers or cucumbers, depending on which poll you read). Who can argue? Tomatoes taste great, have many uses, and there are so many varieties to choose from, that there is sure to be one kind for everybody.

Like many of you, I enjoy growing tomatoes and especially starting them from seed. While I won’t say it is overly difficult to grow tomatoes from seed, there are some things you can do to increase your chances of success. I put together a short list you can follow.

Start Indoors
As with many other other vegetable seeds, tomatoes are no different. Start them indoors. I had one friend who started his tomato seeds in February here in NJ. While that was way too far in advance, even he admits it as he lost all of his window sills for quite sometime, starting them indoors and being able to move fairly grown plants outdoors will get you to a tomato crop much faster. If you have a short growing season, starting them even earlier indoors isn’t a bad thing though.

Acclimation
More commonly known in the vegetable gardening world as “hardening off”, you will want to acclimate your tomato plants to the outdoors gradually so as to not shock them. As temperatures warm up out doors during the day, take your plants outside for a few hours at a time before you transplant them to their final destination. When the night time rolls around, bring them indoors. It may see like a lot of work, but it’s really not. It will become part of your daily routine for a couple of weeks.

Sun, Sun and more Sun
While many varieties of tomatoes will grow in partial shade, one thing is for sure, they love the sun. The more sun they get, the better off they will be. If you are limited with space available where full sun is possible, don’t be afraid to put some tomato plants in large pots and move them around.

What are some of your tips for starting tomatoes from seed? Be sure to post them in the comment section below and share with others.

About the Author
Mike Podlesny is the author of Vegetable Gardening for the Average Person: A Guide to Vegetable Gardening for the rest of us, the moderator for the largest vegetable gardening page on Facebook and creator of the monthly Seeds Club.

Watch the video below to learn more about Mike`s Seeds of the Month Club:

Monday, February 7, 2011

Avoid these 6 Mistakes when Starting Tomato Seeds


Germination and development are critical phases for tomato seedlings. If you know what seed starting mistakes to avoid, you have an excellent chance to grow strong, healthy tomato plants to set out in your garden.

Mistake #1: Wrong planting medium
Fungi and bacteria in non-sterile soil can lead to damping off. When seeds dampen off, they don’t germinate. When sprouted seedlings contract damping off, they thin at the soil line, flop over, and die. Do everything possible to prevent damping off organisms from infecting your tomato seed starting flats. Avoid using garden soil to start seedlings because it is packed with bacteria and fungi. Potting soil is not the best option for starting seeds, either, because it is heavy and too high in fertilizer. Sterile potting mix, either purchased or home made from peat moss, perlite, and vermiculite, is a better choice for planting tomato seeds.

Mistake #2: Overwatering
Soggy potting mix can lead to seed rot, which can mean no germination. No sprouting = no tomato seedlings = no plants. Keep your potting mix evenly moist.

Mistake #3: Cold or drafty room
Maintain your room temperature between 70-80° F. Sustained cool temperatures can mean slow germination and slow growth. But be careful that the area is not too hot either, which can lead to leggy plants.

Mistake #4: Poor light
Sometimes tomato seeds will germinate and grow well for a couple of weeks. But when they are a couple of inches tall, they may bend toward the light and look stringy. Avoid scraggly plants by providing adequate light. Make sure plants are in a sunny window with 12-16 hours of light a day or place them 1-3 inches beneath grow lights.

Mistake #5: No transplanting
The purpose of transplanting seedlings is to stimulate root development. Plants started in smaller containers (cell packs, peat pots, or seed trays) and then moved to 4-6 inch pots develop stronger root systems than plants which are not transplanted at all. When transplanting, it’s wise to submerge the exposed stem deeper into the soil, thereby supporting the plant, preventing legginess, and stimulating root growth along the buried stem. Seedlings that are not transplanted fail to develop as strong root systems. Transplant seedlings when plants have two full sets of leaves.

Mistake #6: Inappropriate tomato varieties
Even when you start and grow healthy plants to set out in the garden, if you choose varieties that are inappropriate for your zone or for your gardening conditions, you may not harvest a quality crop. For instance, if you live in a cool, wet climate and start tomato varieties that do best in hot, dry areas, your crop may not produce high numbers or quality fruit. Or you may plan to grow container tomatoes, which require dwarf or tumbling varieties to do best. But the large garden varieties you started indoors won’t flourish in containers. Take time before you plant seeds to choose tomato varieties that are best for your situation. Then by carefully monitoring your tomato seedling crop, you can ensure a healthy, productive outcome this tomato season.

About the Author
Kathy Widenhouse is a contributing writer for Mike the Gardener Enterprises and owner of Tomato Dirt (www.tomatodirt.com), a leading source for information on growing tomatoes and using them.

Monday, November 1, 2010

Four Keys to Watering Tomato Plants

While you can’t control the sun or wind, you can control the amount of water your tomato plants receive. Consistent watering is an important key to healthy tomato plants.

It’s simple to achieve when you know where, when, how, and how much to water tomatoes.

Where should you water?
Water at the soil line. You’ll help build your tomato’s root system. Avoid overhead watering, which spreads diseases.

When should you water?
Water tomato plants during the day. Some gardeners prefer morning watering to fortify plants for the heat they’ll endure as the day wears on. Others water when the sun is high as a way of cooling leaves. But which ever you choose, on one point gardeners agree: avoid watering tomato plants in the evening. Leaves that are wet overnight are susceptible to the spread of fungi and other diseases.

How should you water?
Water slowly. Let water sink into the ground to help plants develop strong roots. Hand-watering and drip irrigation are more effective than overhead watering. When the soil surrounding your tomato plant is moistened 6-8” deep, you’ll know you’ve done your job well.

How much should you water?
Consistent watering produces stronger plants and larger fruit. Water newly-planted tomatoes at least a quart for 7-10 days. In the height of summer, water plants 2-3 times a week. (Rainfall counts.) Later when temperatures cool, scale back to once a week.

About the Author
Kathy Widenhouse is a contributing writer for Mike the Gardener Enterprises, LLC and owner of Tomato Dirt (http://www.tomatodirt.com), a leading source for information on growing tomatoes and using them.

Tuesday, October 13, 2009

Home Vegetable Gardening: Two Tools You Should Not Be Without

Like most home vegetable gardeners, I started with simply planting seeds of the vegetables I wanted to grow, adding some water, pulled weeds, and waited it out. Over time I realized that although this simple method works to grow great vegetables, I was doing me and my garden a great disservice.

By not paying attention to the soil’s pH level and the amount of moisture in the soil I was limiting the production of certain plants that could have benefited by making some adjustments. Just like a really good NFL head coach who makes game time adjustments, you too as a home vegetable gardener need to make adjustments in your soil as the season moves along.

There are two tools you should get to know that will help you make these adjustments based on the vegetables that you grow. They are the pH tester and the moisture tester. Each tool can be found at a local home or garden center in your area or purchased online. Simple ones cost as low as five or six dollars while more advanced models can go as high as one hundred dollars. How advanced you want to get is up to you, but most home vegetable gardeners usually go with the low cost varieties since they do an adequate job for the tasks at hand.

Soil pH Tester
Let’s start with the soil pH tester. The pH level is the measure of how acidic or alkaline your soil levels are. If you remember from your high school chemistry class, the scale goes from zero to fourteen, where anything under seven is considered acidic and anything over seven is alkaline with seven being neutral which is water.

Certain plants like the soil more neutral. Cauliflower for instance grows best when the soil pH level is in the 6.5 to 7.5 range, where as carrots like the soil a bit more acidic in the 5.5 to 6.5 range. So what happens when the pH level of your soil is not in the ideal range? If it is too acidic or too alkaline then you may not produce anything, or your harvest is very limited. By using a soil pH testing kit you can get an accurate reading of your soil’s level and then make adjustments based on what the test tells you (most kits come with recommendation charts for your soil so you can adjust the level accordingly). For the cost of less than seven bucks at some home and garden centers it is well worth the price.

Soil Moisture Tester
Testing your soil for its moisture level means you are looking for a reading of how much water is in your soil and around the roots of your plants. This can become extremely important so as you do not overwater your plants. A couple of things happen if when you overwater.

First, too much water can wash away valuable nutrients in the soil such as nitrogen. Ever see your vegetable plant leaves turn yellow? A common cause of this is lack of nitrogen in the soil. Nitrogen washes away easily and when you water too much you are removing a nutrient your vegetables need to grow.

Second, too much water can cause the roots of plants to develop what is called root rot. This is caused by overwatering creating a condition around the roots where they are unable to obtain the air they need. When this happens the roots will begin to rot and will kill the plant. If your land has excellent drainage you may never run into this problem but I would recommend investing in this inexpensive tool and measure your soil’s moisture level just to be sure.

With these two valuable tools you will now be armed with the information you need to ensure a healthy and prosperous harvest. Combined these two tools can cost you less than fifteen dollars (depending on where you buy them from of course). Do yourself and your vegetable garden a favor, use the tools.


About the Author
Mike is the author of the book Vegetable Gardening for the Average Person: A Guide to Vegetable Gardening for the Rest of Us, available at Amazon, Barnes & Noble and where ever gardening books are sold. For more vegetable gardening advice, Mike can be reached at his website: AveragePersonGardening.com.

Friday, September 18, 2009

How to Grow Cauliflower in your Home Vegetable Garden

Cauliflower is part of the cabbage family. However, unlike the cabbage plant, cauliflower can be easily stressed. If not taken care of properly it will lead to a less than adequate harvest.

If you are a fan of cauliflower (which I am once I cover it with melted cheddar cheese), then you should definitely add a head or two to your home vegetable garden.

Here are the steps you can take to ensure a good cauliflower harvest in your home vegetable garden.


Tuesday, September 15, 2009

How to Grow Melons in your Home Vegetable Garden

Melons aren't vegetables of course but that does not mean you can't add a few varieties to your home vegetable garden.

Melons range from cantaloupe to watermelon and honeydew and many other varieties in between.

Most grow on vines, so they do take up some space if you do not put the time in to have them grow vertically up a trellis.

If you are willing to either put the time in to direct growth vertically or are willing to part with your gardening area, melons can add some great tasting produce just a few feet from the kitchen window.

Here is how you can successfully grow melons in your own home vegetable garden.


Wednesday, June 10, 2009

Vegetable Gardening: The Rabbits Ate My Tomatoes, Now What?

Seven years ago I moved into my new home in the suburbs. I lived in a city where the sight of a rabbit was as a rare as Halley’s Comet. In fact in the city in which I lived, pigeons were more of a problem than any other type of animal you could think of.

So I started my garden in my new home. A row of beefsteak tomatoes, a row of grape tomatoes, peppers and so on made up my plot of land that I designated to grow my produce. With no experience in protecting my garden from rabbits, once my plants were in the ground I figured I was done so I simply walked away.

The next morning I arose to see that both rows of tomatoes (beefsteak and grape) were absolutely decimated. Chewed down to the stem with about an inch of height from the topsoil, the rabbits left near nothing.

After doing some research, instead of buying new plants I learned that the tomatoes will return and that they grow like a weed, meaning, that even though they were chewed down to the stem, tomato plants will still grow even though their solar collectors (their leaves) no longer existed.

But I also knew that if I did not take any preventative measures the rabbits would be back to finish the job. So here is what I did. First, I outlined my garden with landscaping bricks and set them two bricks high. That alone will not keep the rabbits out so I also added a fence. I use poultry fence which is available at any home center. Sixteen inches of height is all you will need for rabbits (at least in my area).

I attached the fencing to some pieces of cedar wood that acted as fence posts, which holds the poultry fence in place. If you are unfamiliar with poultry fence, it is very wobbly, “bendy” you could say, so you will need to attach it to something in order to stabilize it. I used J-T50 staples to attach it to my posts. They are also available at any home center.

The bottom of the fence sits about an inch to two inches lower than the top layer of brick. I am not sure if rabbits can squeeze in, but I did not want to take any chances.

The bricks were the most expensive at about two dollars per brick, and the fence was thirteen dollars for a fifty foot roll. I found the wood on Craigslist for free, so other than the cost of gas to drive a couple of miles to go get it, that part was free, and I already had the staples from a pervious project. So the cost to secure my garden from rabbits was nominal at best.

If you are having issues with rabbits give these solutions a try. It is a cost effective solution without having to spray any chemicals that are developed to “deter” rabbits. Also make sure you buy poultry fencing and not the “so called” rabbit fence. The rabbits can and have gotten through the “rabbit proof” fence in my area in the gardens that belonged to some of my neighbors.

About the Author
Michael is the author of the book Vegetable Gardening for the Average Person, a practical easy to follow guide for the home vegetable gardener. You can follow him on Twitter as well as join his Facebook Fan Page.

Monday, June 8, 2009

Vegetable Gardening: Is there a right time to water the garden?

It is Monday morning and it is raining cats and dogs. You think to yourself that the buckets of water that are falling out of the sky are a good thing. Good because your vegetable garden really does need a good watering. So you grab your hot cup of coffee, stair out the window and watch as much needed rain falls onto your plants that you are hoping will produce a lot of vegetables.

Later that week, Thursday rolls around faster than a cherry red Corvette on a straight away leading you to wonder where did the go? You check you calendar and have marked on there that it is time to water the vegetable garden.

Instead, you choose not to because, after all, on Monday the rain was tremendous. This scenario is the trap that we as gardeners can fall into if we are not careful, and that is not watering the plants enough. Many studies have shown that vegetable plants, especially those still in their infancy, need plenty of water.

Also, by watering more, creating a watering technique called deep watering, what you are doing is creating an environment underneath the top layer of soil where the roots of your vegetables will have to dig deep. That in turn will strengthen their roots and make them healthier plants

If you tend to only water once per week or water for short period of times throughout the week, then you are doing a disservice to your home vegetable garden. All is not lost though as it is easily fixable.

If you don’t own one already, invest in a soaker hose. You can get them for around thirteen dollars at Wal-mart. Just look in their gardening section. A soaker hose looks like a regular hose except there is not end to attach a spray nozzle onto. Instead the water seeps through pores in the house at a slow rate which allows for better watering.

Simply attach your soaker hose to your water source like you would any other hose, and the situate the hose up and down rows throughout your garden.

The soaker hose accomplishes a couple of things. For starters, because the water is being dispensed at a slower rate, this allows for the water to drain better through the top layer of soil. Secondly, as many experts agree, it keeps the water off the foliage of the plants and directs more to where it is needed and that is at the root level.

Finally water first thing in the morning for 30 to 45 minutes every 4 days or if you are in a climate where it is hot and humid, then for every 3 days. More importantly do not let your plants, especially the young ones, go very long without water. It could stunt their growth and potentially kill them.

Follow these tips on watering above to make sure you are doing it right. Watering is not as complicated as some make it out to be, but when done wrong it could limit the production of their gardens.

About the Author

Mike is the author of the book Vegetable Gardening for the Average Person. It is a practical easy to follow book that teaches gardeners everything from composting techniques, aeration and frost conditions, to choosing the right tools and picking the right seeds. You can, follow him on Twitter as well as join his Facebook fan page.

Friday, May 29, 2009

Help the Environment and yourself, Recycle your Food Waste


Billions upon billions of pounds of food waste every year are thrown away with the regular garbage pick up. This puts a tremendous strain on not only our environment but our wallets to pay people to come pick it up and hail it off to a local landfill.

All is not lost though. You can do your part and solve this problem by recycling your food waste. By recycling your food waste you are create what is called compost. Compost is the end result of organic matter that decomposes.

Your food waste doesn’t simply sit in your kitchen and rot away, which wouldn’t be too pleasant, you actually do something with it and that is you bury it. I will get to more on that in a moment.

The first step is to get yourself a giant Tupperware bowl that, from now on, you can put your food scraps into. Everytime you have leftovers that would normally go into the garbage you redirect that food waste to your Tupperware bowl.

When the Tupperware bowl gets full you will bury it in your backyard. Dig a hole about one to two feet deep and empty the contents of the Tupperware bowl into the hole. Now cover the hole with the dirt. That is it you are now done. You have just recycled food waste.

Now comes the exciting part that you don’t actually see, but trust me it is happening. There is an entire ecosystem that lives underneath that top layer of soil. When you bury food they work hard decomposing that food and give back to you compost.

Compost is filled with nutrients and minerals that plants, trees, flowers, shrubs and any other type of plant require in order to grow and be healthy. By you burying your food waste you are reintroducing these nutrients back into your soil and at the same time recycling waste that would go to a landfill somewhere.

Just keep in mind not to bury food in the same spot sooner than 60 days. It will take about that time for the underlying ecosystem to decompose the waste thoroughly. Just pick a new spot and repeat. If space is limited you can dig a 3 foot hole, dump the waste in, then put a 2 to 3 inch layer of dirt on top, then when the Tupperware bowl is full again, you dump it on top of that, and then more dirt and so on until the hole is full. This helps use the same space more than once.

If you want to get even fancier when your space is limited, you can build what is called a compost bin or a worm box, put your food waste in there with some red worms and they will take care of the rest. When they are done eating the food you remove the compost that remains, mix it in with your soil around your flowers, trees and shrubs and keep doing it.

Someone once said garbage is just another product. It’s just that no one has found a use for garbage just yet. Well in this case you have. Pull double duty helping the environment by burying your food waste.

About the Author
Mike is the author of the book Vegetable Gardening for the Average Person. It is a practical easy to follow book that teaches gardeners everything from composting techniques, aeration and frost conditions, to choosing the right tools and picking the right seeds.