Tuesday, August 21, 2012

Grow Watermelons in your Garden, Vertically!

While I would be the first to admit that growing watermelons vertically isn't the best method, for many of us, when you lack space, you have to do what is best to get the results you are looking for.  

There is nothing wrong with growing watermelons vertically, you will just need to do a couple of extra steps to ensure that the watermelon has something to grow up and of course can be propped up.

Let's start with what you can use as a vertical support system.  If you have grown cucumbers, beans, or peas then you already have the experience needed for vertical watermelons.  You will simply use a trellis.

A trellis made from some wood or netting will work, but keep in mind the watermelon vines and the watermelon itself will get fairly heavy, so try to use something that can easily withstand their weight.  As you can see in the photo above I am using a lattice trellis made from pine wood and then stained with a water based outdoor stain.  This gives me the strength I need to support the vines, and of course the watermelon.
 
Be sure to join Mike`s vegetable seeds mailing list

This brings me to the support portion.  How do you support such a heavy fruit?  Well, there are a number of ways that I have seen it done, but the one that works best for me is a simple shelf.  

I took two pieces of old pine wood that I had in my garage and made an "L" shaped shelf.   One part of the shelf will attach to the trellis itself, I will get to more on that in a moment, and the other part will support the watermelon.


I took this step to the extreme and attached the two pieces of wood to make the shelving unit, using dove tail joinery.  If you have been following my blog you also know by now that I love woodworking as well.  This type of joint is very strong, and gets just some glue to keep the two pieces of wood together. 

You can use outdoor deck screws to attach the pieces as well, as that will hold also.  I try not to use nails as they are not as strong as screws or the dovetail joints....at least in my opinion.


I attached the shelving unit to the trellis using nothing more than two deck screws, long enough to go through the shelf and of course the trellis.  Try not to go all the way through the trellis as you will have the pointed end of the screw sticking out which could scrape you later. 


And that's it!  You can stain the shelf itself if you would like it to withstand the weather for a few seasons.  Pine does not wear well in the outdoors.  I did not preserve this particular shelf, but might sand it down and give it a couple coats of water based stain in the gardening off season.  We'll see.  I included another photo below of larger watermelons sitting on another shelf for support, attached to the same trellis.


About the Author
Mike Podlesny is the author of Vegetable Gardening for the Average Person: A Guide to Vegetable Gardening for the rest of us, the moderator for the largest vegetable gardening page on Facebook and creator of the monthly Seeds Club.

Watch the video below to learn more about Mike`s Seeds of the Month Club:

Monday, August 13, 2012

Getting Started, Canning your own Home Grown Vegetables and Fruits

Many vegetable gardeners out there such as yourself grow more fruits and vegetables then you can consume before they start to decay or rot. While giving away a portion of what you grow, whether it’s to a friendly neighbor or simply a donation to a local soup kitchen or food pantry, is a good thing, you can also preserve much of your harvest for the months in which you are not able to grow in abundance or at all.

While many methods for preservation exist, there are two common ones that have been around for quite some time and are becoming more popular every day. You can tell when something is becoming popular when more and more stores carry a line of products to handle the tasks of that “something”.

In this case that “something” is food preservation and the two popular methods for handling such a task are boiling water canning and pressure canning. Each serves a specific purpose, which i will get to in a moment, and both are valuable as well as easy to do. They each require some basic equipment, and a little know how.
 
Be sure to join Mike`s vegetable seeds mailing list

Boiling-Water Canning
The method of boiling water canning is used when foods are high in acid, such as lemons, peaches, tomatoes, plums and so on. These, and many other items like them, have a pH level at or below 4.6, meaning they have a high acidic content.

This method is conducted by bringing a pot of water to boil at 212 degrees Fahrenheit and submerging jars filled with whatever you are preserving into the boiling water and letting them sit there for a period of time.

High acid foods are processed using this method. Sometimes, recipes call for adding lemon juice so as to increase the acidity of the mixture. The combination of the high acid and the temperature at which the jars are boiled at result in destroying molds, yeasts, various forms of bacteria and inactivate some enzymes.

I will talk about pressure canning in a moment, however, never use the boiling water method to preserve foods that are not high in acid such as beans, peas or corn. For those items you need a temperature of 240 degrees Fahrenheit to destroy bacterial spores that exist in low acid foods, and that can only be obtained with pressure canning.

Pressure Canning
That brings me to the second method of canning, pressure canning. The only way you are going to get the water in your pot up to 240 degrees Fahrenheit is through pressure canning. This temperature is important because it destroys all bacteria, spores and toxins that low acid foods produce.

Besides the popular varieties of veggies mentioned earlier that fall into the category needed to be pressure canned, okra, carrots, beets and turnips are a few more. These veggies are above the 4.6 pH level.

There is a special piece of equipment used for this method called a pressure canner. No surprise there right? The basic items of this canner are the base, a lid, the gauge (dial or weighted) and a rack. The total cost for this canning package, which is sold as a complete set (although you can buy replacement pieces), runs anywhere from $60 to $100.

The way it works is to submerge your jars of low acidic foods into the base and place them on the rack inside, place the lid on your canner and use the gauge to monitor the pressure and temperature. The gauge will release small amounts of steam to maintain the proper pressure inside the container.

Be sure to follow the maintenance instructions that come with your pressure canner. The gauge which measures the pressure in your canner, should be tested for accuracy (dial gauge only) usually once per year and replaced if the reading is off by 5psi (pounds per square inch) or more. A weighted gauge does not need to be tested for accuracy but must be replaced if there is any damage to it.

Some helpful utensils such as a jar lifter, jar funnel, bubble remover, headspace tool and lid wand, make canning that much easier as each of these utensils can be used in both methods.

I would recommend starting off with something easy. I canned peaches as my first run through the canning process. It was easy because I was able to use the boiling water method, and I had the proper items needed already in my home. Then I moved to tomatoes and pickles still using the boiling water method.

Like anything else it takes practice. Don’t be afraid to make a few mistakes, or in my case, messes, along the way, and you will be fine.

About the Author
Mike Podlesny is the author of Vegetable Gardening for the Average Person: A Guide to Vegetable Gardening for the rest of us, the moderator for the largest vegetable gardening page on Facebook and creator of the monthly Seeds Club.

Watch the video below to learn more about Mike`s Seeds of the Month Club:

Friday, August 10, 2012

Turn Your Home Grown Cucumbers into Pickles

Have you ever grown your own cucumbers?  If so, then your next step of progression is to turn all of those wonderfully juicy cucumbers into great tasting pickles.  If you have never grown cucumbers, then this blog post should get you excited to do so, as you will see just how easy it is to turn those home grown cucumbers into great tasting bread & butter pickles.

I will say this.  I don't care what recipe you follow to make pickles, if you do not start with good fruits or veggies, your end product won't matter.  Canning will not make it taste better, only preserve the great taste it has to begin with.

So for this exercise, let's start with some home grown cucumbers.  This year I grew Ashley cucumbers.  They yield plenty to work with and taste great.  Not the most ideal variety for pickling purposes, but adequate none the less.  If you want a great tasting, true pickling cucumber, go with the Boston variety.

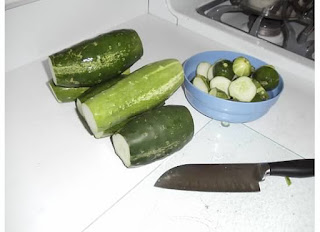
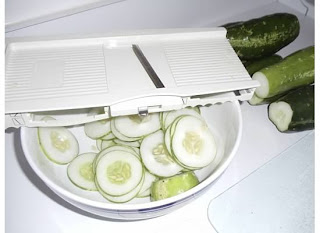
Once you have your cucumbers, slice off the ends as it makes it easier to have a flat surface of the cucumber to work with when using a mandolin slicer.  If you don't have a slicer, not to worry, simply use a sharp knife. 

I would have really liked to slice them with a "crinkle cut", but I did not have that attachment, so I settled for plain old flat.

The slicer I use has a nice feature where it "grips" the bowl that the slices go into.  This made it much easier to slice the cucumbers much faster.

I talked to a few people and they have electric slicers which work fast and well.  Probably a good idea to get one in the future if you plan on pickling loads of cucumbers as my friend does.

However, a simple mandolin slicer will do the trick.

I did not use a homemade recipe as I went the very easy route and used a pre-made mix.  For my pickles I chose Mrs. Wages Bread & Butter Pickles mix.  The recipe for this mix is as easy as it gets. 

You mix the dry ingredients in the pack with sugar and vinegar and then heat it up over the stove so everything will blend together.  Very simple!


Now go ahead and fill your jars.  Do not fill all the way to the top as you need to leave some room for head space.  

I filled mine up to just about where the jar starts forming into the mouth.

I also used my canning funnel to make sure none of the residue of the pickles touched the tops of the jar.  While not catastrophic if it does, it makes cleaning easier.
Now that your jars are filled with cucumbers, using a ladle, start pouring the hot pickling mixture into your jars.  Definitely use your funnel for this step.  

Fill the jars with the liquid leaving about a 1/4" of head space.  That is a 1/4" of space from the top of the jar where the lid will sit.

Once the jar is filled, make sure you remove as much air from between the cucumbers as possible by sliding a butter knife (or some other non sharp object) down inside the jar, moving the cucumbers off the side.

You can use the hot water bath method for this process.  I explain the hot water bath method, here, for tomatoes.  The process is the same.

The back of the mix packet will tell you exactly how long to heat this up for, which will be 35 to 45 minutes, depending on where you live as your locations altitude makes a difference.

And that's it!  Great tasting bread & butter pickles, made from cucumbers, right out of your garden.  Once you make these, and see how easy it is to do, you will never want to buy pickles from the store again.

About the Author 
Mike Podlesny is the author of Vegetable Gardening for the Average Person: A Guide to Vegetable Gardening for the rest of us, the moderator for the largest vegetable gardening page on Facebook and creator of the monthly Seeds Club.

Watch the video below to learn more about Mike`s Seeds of the Month Club:

Thursday, August 9, 2012

Life Expectancy of your Vegetable Seeds

One of our Vegetable Gardening page members shared this chart with us.  This will give you some general knowledge on the lifespan of the seeds that you own and why it's important to write the date on them as to when you get them. 

Be sure to join Mike`s vegetable seeds mailing list

Watch the video below to learn more about Mike`s Seeds of the Month Club:

Friday, August 3, 2012

How to Can your Home Grown Tomatoes

Growing your own food is a thrill.  You will feel a tremendous sense of accomplishment.  Whether you start from seed or get some plants from a local nursery, when you take a bite out of that first home grown tomato, you will never want to eat a store bought one again.

But what happens when gardening season ends?  This is where storage comes into play.  I recently wrote a few articles on basic storing methods, but in this article I want to give you specific steps to "can" those home grown tomatoes using the water bath method.


The canning items you will need are the following:
  • Some canning jars.  These are available for about $9 to $14 per dozen, depending on the size.  They come in pints and quarts as well as wide mouth and narrow mouth.  For this article, I am using quart sized jars with narrow mouths.
  • Jar bands and lids.  These usually come with the jars, however the lids are not reusable.  I'll get to more on that in a moment.
  • Some utensils.  These will include a lid grabber, which is nothing more than a stick with a magnet on it, a jar grabber, and a funnel.
  • You will need a large pot that is deep enough to put the jars in and have at least one inch of water on the top.  Many places sell a pot/utensil combination kit for $30 to $50.
Items that you will need that you may have around your house already, but will need:


  • Lemon Juice
  • Salt (optional)
  • Tablespoon
  • Teaspoon
  • 2 pots, 1 for hotwater, 1 for ice water
  • Tongs to grab the tomatoes
  • A ladle for the hot water you will add to the jar


For this article I chose roma tomatoes that I grew in my garden.  The steps are the same for any tomato, but the romas are perfect for marinara sauce.  I like my beefsteak tomatoes for salsa.  I'll save that for a seperate article.

Be sure to join Mike`s vegetable seeds mailing list


STEP 1 - Peel the Tomatoes
While you don't absolutely have to remove the skins, your tomatoes will taste much better later on when you go to use them.


The simple way to remove the skins is through the blanching process.  Bring a pot of water to a boil.  Once the water is boiling, drop your tomatoes into the pot for 45 seconds.  You will see the skins on the tomatoes start to crack and seperate.
After 45 seconds, start removing the tomatoes with your tongs and immediately plunge them into another pot filled with ice water.


Now you are ready to start peeling the tomatoes.  There is no real science to this.  Just use your fingers and hands, and start peeling away.  I like to keep a bowl nearby to throw the peels into.  I will then throw those peels into my compost bin.  Nothing goes to waste!  Or at least I try to make sure nothing goes to waste.


STEP 2 - Add Some Ingredients

To your empty jar, add two tablespoons of lemon juice and 1 teaspoon of salt.  The salt is optional.  Meanwhile, before you get to the next step, get a pot of water going on the stove.  You will add the hot water to your jar in a later step, but you need this for the liquid to add to your lemon juice.  Some recipes I have read said make sure it is boiling, while others said it only needs to be hot.  I just heated mine up.  Never brought it to a boil and it works fine for me.

STEP 3 - Put the Tomatoes in your Jar
How you can your tomatoes is up to you.  Some people like to can them whole, while me personally I cut them in half.  The choice is yours and the process is still the same.


Using your funnel (which helps keep tomato residue off the lids and sides of the jar), start putting your tomatoes in your jar until the jar is filled.  Make sure you take up as much space as possible.  DO NOT FILL ALL THE WAY TO THE TOP.  Leave about 1/4" of head space (space between the top of the tomatoes and the top of the jar.
STEP 5 - Add hot water
Take a large spoon or ladle and start taking water from your pot of hot water (from step 2), and slowly add it to your jar of tomatoes.  In between each ladle of water, use a butter knife or a spoon and gently slide it down the inside sides of the jar to help release any air trapped between the tomatoes.  Fill the jar with hot water leaving a 1/4" of head space.

STEP 6 - Add your jar to the water bath

Place your jar of tomatoes in your large pot of hot water.  As you can see in the picture, the pot that I am using comes with a basket with handles which makes it easier to put many jars on and then lower the basket into the hot water.  It also allows for space underneath the jars inside the pot as well.


STEP 6 - Remove the Jars


Pints will need to be in the hot water for 35 minutes, quarts for 45 minutes.  If you live in areas of higher elevation you should add another 10 to 15 minutes.Once the the time has elapsed, use your handy jar grabbing tongs, and remove the jars from the hot water bath and place them on a cooling rack. 

Leave the jars there to cool for 12 to 24 hours.  You will hear a "pop" sound when it completely seals.  This usually occurs within the first few hours.  If after 12 hours you did not hear the pop, or you can easily push the center of the lid of the jar in and out, then it means the jar did not seal properly.

I have read you have up to 24 hours to attempt to reseal, however at that point I simply just consume the contents of the jar within 3 days since I try and do all of my canning in a single day.  I'd hate to start all over again for a single jar.  The choice is yours.

And that's it!  Store away in a cooland dry location out of the way of any sunlight.  Basements work best for this.


About the Author Mike Podlesny is the author of Vegetable Gardening for the Average Person: A Guide to Vegetable Gardening for the rest of us, the moderator for the largest vegetable gardening page on Facebook and creator of the monthly Seeds Club.

Watch the video below to learn more about Mike`s Seeds of the Month Club:

Wednesday, August 1, 2012

Vegetable Gardeners, the End is Near! Are you Prepared?

Ok, take a deep breath. The end of vegetable gardening season is near its end. In the United States anyway. Our friends in the land down under are about to begin theirs. However, now that the season is nearing its completion have you been taking the steps and doing the things necessary to have your fresh, home grown veggies, even in the winter months?

One of the greatest thrills of growing your own food is the luxury of having healthy fresh food at anytime. Think about how wonderful it is, when you go to make your own marinara sauce and you can simply walk outside into your backyard (or wherever your garden is) and start picking the recipe’s ingredients literally seconds before they are used.

What happens though when those items are no longer in season? That’s the beauty of many techniques which make it possible to enjoy those home grown items all year round.

Let’s start with one of the simplest things you can do, to preserve that harvest. That would be blanching your veggies and freezing them. This technique works great with such items as potatoes, carrots, corn, beans and peas. Blanching simply means boiling your veggies in water for 2 to 5 minutes and then immediately removing them from the boiling water and submerging them into a bowl of ice water. The next step would be to freeze them in an airtight vacuum sealed bag. I own a Foodsaver so it makes this process easier, but there is a neat technique you can use if you do not own one. 


Fill a pot with cool tap water. Then grab a Ziploc freezer bag. Make sure the bag is open and place the bag into the water. Do not submerge the bag as you do not want any water to get into it. Now add your blanched veggies to the bag. As you fill the bag with veggies, because it is sitting in the water, the air will get pushed out the top. While this won’t eliminate all of the air, it will get rid of a lot of it and help with a longer freezer life and less burn. 


For fruits and veggies that have higher acidic contents (tomatoes, peaches etc) learn the water bath canning method. It requires nothing more than a few utensils, a large pot of boiling water, some canning jars and of course your time. I guarantee, that once you learn how to can your fruits and veggies, you will wonder why you did not do it sooner. Canning vegetables will give you the opportunity to take those home grown fruits and veggies and store enough for an entire year. Now that is being prepared!

When your jars have a good airtight seal, the food contents will stay fresh for up to a year . Which is perfect, because in a year’s time, you will be ready to grow more!

I’ll talk about pressure canning in a future post. This is for those items where a higher temperature is needed for proper removal of any and all harmful bacteria.

About the Author
Mike Podlesny is the author of Vegetable Gardening for the Average Person: A Guide to Vegetable Gardening for the rest of us, the moderator for the largest vegetable gardening page on Facebook and creator of the monthly Seeds Club.

Watch the video below to learn more about Mike`s Seeds of the Month Club: